

Collection pages are crucial to merchants, as they can give buyers a first impression of available products and their prices. In contrast to a landing page, this page is often where customers will make a decision on whether to purchase a product, so any improvement we can make to the user experience at this point can drive conversion for your clients.
A one-size-fits-all approach may not always work for your client’s collection page, especially if the products come in many different shapes and sizes. For example, your clients may have a range of different prices for each product variant, and would like to represent this price range on the collection page.
In this tutorial, we’ll look at how to display prices as a range, rather than one single value, using Liquid objects and tags. We’ll also look at how variables can be created to simplify code, and how control flow tags can allow us to render content on specific pages.
Grow your business with the Shopify Partner Program
Whether you offer marketing, customization, or web design and development services, the Shopify Partner Program will set you up for success. Join for free and access revenue share opportunities, tools to grow your business, and a passionate commerce community.
Sign upStep 1: Locating our product prices
The very first step we’ll need to take is to identify exactly where in our theme the code for outputting product prices is located. The location of the price-related code can differ from theme to theme, as some themes will have a specific snippet file dedicated to price, while other themes combine all product-related code in one Liquid file.
An effective way to locate the code for outputting product prices is to search the theme for Liquid objects associated with prices. When we try searching for variant.price or product.price objects in theme files, we should find them located in a snippet file. If you’re editing your theme locally on a text editor like Atom (which can be further extended using these Atom packages), searching through the whole project will be easier.
Theme developers will often use assign tags to create variables in order to write cleaner and more readable code. This means you could find that the variant.price or product.price object is assigned a variable within the snippet file we are customizing.
Here is an example of how a variable could be set up for a variant price:
<p>{%- assign price = variant.price -%}</p>
<p>{%- assign money_price = price | money -%}</p>
We can see here that the variant.price object is first given a variable of price, while the second assign tag creates a variable of money_price, which applies a money Liquid filter to the product price. This money filter ensures that the value is outputted with the correct currency formatting.
If you find that variant.price, or product.price is assigned a variable in a snippet file, it’s likely that you will find the code we need to customize in this file.
You might also like: Announcing Shopify Liquid Code Examples for Partners.
Step 2: Customizing our snippet file
Once we’ve found the code for outputting the product price, we should see something like the following:
For this tutorial, we’ll be replacing the code for compare_at_price with objects and logic that will display the minimum and maximum product prices. Thankfully there are already Liquid objects that output the minimum and maximum values of product prices.
We’ll be removing the following lines from the above code example:
{% if compare_at_price > price %}
  {{ compare_at_price | money }}
And replacing them with:
{% if product.price_varies and template == 'collection' %}
  From {{ product.price_min | money }} to {{ product.price_max | money }}
We are using control flow tags to set up two conditions that when true, will execute the code below it. The and operator here allows us to include more than one condition in a control flow tag, which is a very useful device for creating complex conditionals.
In this case, we are checking if there’s a variation in the product prices, and if the current page being viewed is a collection page. If we detect a price variation, and the page is a collection page, then the product.price_min and product.price_max output the lowest and highest variant prices.
It’s important that this code only applies to a collection page, since other pages of the online store, like the product page, display the price for the currently selected variant. This price adjusts dynamically when another variant is selected, which is the expected effect that we would like to maintain on a product page.
Once these conditions are added, the price-related part of your file should look like:
We can also see that the {{ money_price }} variable we looked at in step one will be outputted in the case that there’s no variation in pricing, or if the page a buyer is viewing is not a collection page.
You might also like: How to Customize the img Element in Shopify Themes.
Step 3: Styling our changes
Finally, we’ll need to adjust the class names and CSS related to your prices. Since we’re removing the code connected with the compare at prices, we will need to also remove the class names associated with compare at prices.
For example, in this case, I am working on Debut and need to simplify the opening description list class from <dl class="price{% if available and compare_at_price > price %} price--on-sale{% endif %}"> to just <dl class="price">.
You may also need to edit the stylesheet of your theme to add text decoration or font weight that matches how prices appear in other areas of the store. Testing and adjusting the styling will ensure that the prices appear in a consistent and appropriate format.
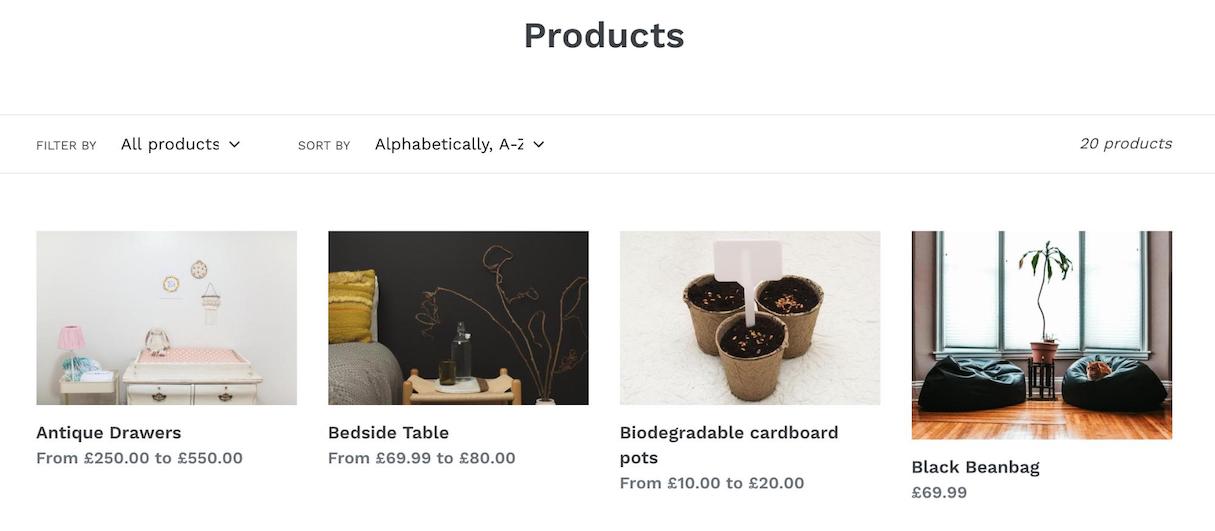
Once this is all set up, we’ll see the available price ranges for your products when we navigate to the collection page on your online store:
Thinking outside the box
Liquid objects, tags, and filters offer a wide range of flexibility that can be built into your custom themes. If your client has a specific requirement, you can leverage Liquid to display their content in a way which suits them best.
By examining the types of products your clients have, and by seeing how different Liquid objects and design techniques could improve their visibility, you can add value to your projects. Stay tuned for more tutorials exploring how to customize the collection page and other areas of the online store.
Have questions about displaying price ranges on Shopify collection pages? Let us know in the comments below!
