
Authored by Kirk Williams, ZATO
Congratulations, retail store owner on Shopify! You successfully brought your in-store inventory online. That’s not easy work, and getting this far is impressive.
Now what?
Having a website is great, but you also need to drive people to your new Shopify website so you can grow your brand and get more customers buying your products online.
How do you do that?
The purpose of this post is to give you a specific, practical, and easy-to-follow walk-through for getting your Shopify products set up on Google Shopping Ads as quickly as you can, with the best chance for success.
If you already understand the value of the channel and simply want to get your Shopping Ads live from your Shopify store products, then this post is for you. I’ve done my best to make it as practical as possible, with screenshots and specific steps, so someone following this post can go from nothing to live Shopping Ads simply by following the instructions.
💡 What Are Shopping Ads? If you’re unfamiliar with what Google Shopping Ads are, I recommend you first read this excellent article by Brett Curry to cover the basics of the channel and to learn the value of this remarkable advertising product: Shopping Ads on Google: What Every New Seller Ought to Know
Note to the reader: this article is long! In fact, it is the longest I’ve ever written. For that reason, I recommend reading it in one of two ways:
- Read it in one screen, while you are implementing the steps in a second screen as you work your way through the steps (likely needing to take breaks for annoying things like eating, drinking, and… er… other stuff).
- Bookmark it so you can come back and utilize it in the future whenever you have questions on specific sections, such as Google Merchant Center, Google Ads campaign settings, etc.
Good luck!
Table of Contents:
From Shopify to Google Shopping - Step-By-Step
One last caveat before we dive in—I’ve intentionally limited this article to only what’s needed to give you the best, most practical walkthrough to setting up Google Shopping Ads possible.
That means there may be concepts I introduce that not every reader will be familiar with. Instead of going into detail on those concepts in this article (which would turn this into a book!), I’ve done my best to link out to other sources where you can get more information if needed.
Without further ado, let’s dive into the setup process!
SECTION I - SETUP
Step #1 - Choose a Shopping App in Shopify
Let’s begin with the assumption that your products are located in Shopify already. In order to get your products listed on Google Shopping, you need to connect the following:
Shopify > Google Merchant Center > Google Ads > Your live Shopping Ads
With this in mind, you need a way to send your products from Shopify to Google Merchant Center. There are a number of ways to do this. You could export your products and upload them as a spreadsheet or xml file. You could use a 3rd party feed provider such as Feedonomics or GoDataFeed (typically an option for larger, more complex product bases).
For many shops just beginning on Shopify, however, there is a lot to be said for using a simple Shopping Feed App within Shopify. The problem with this is that some of the apps can limit your ability to optimize your product data, and they may set it simply to send your products as they receive them.
This is not ideal because this means your product data is identical to whatever product data you have in Shopify, and there are various reasons you may want to edit only your Shopping product data, without also editing your Store product data.
Because of this, I‘d recommend you use the Shopify Shopping App titled: Simprosys InfoMedia.
I personally like it for two key reasons:
- Affordability: If you have less than 500 products, it is only $5/month. Yes, you read that correctly.
- Editability: Many of the geeky edits we want to make within the Google Shopping feed are possible within the app.
For the purpose of simplifying this article, I’ll utilize the Simprosys Shopping Feed app as the basis for the next steps. You can also utilize your own provider or app if you so choose; just be sure you realize some of the specifics of each step below may vary in that case.
So, sign up for Simprosys and follow the walk-through instructions for setup, or use their helpful explainer video. This is also where you’ll sync Google Merchant Center to Simprosys. If you do not yet have a Merchant Center account set up, complete Step 2 in this guide first.
Simprosys has its own help documentation for these steps, so I’ll just call out a few specific things I think it’s important to be aware of.
As seen in the Settings screenshot below, you’ll want to pay special attention to where your products are being pulled from (we’ll discuss product selection in a future step), as well as variant options.

The client in this screenshot has opted to send each possible variant for their products, not simply the parent item. This is usually advised with Shopping Ads, since it allows Google to show a specific variant for specific searches, thus increasing the potential for conversion.
For instance, if someone searched for a “men’s medium chartreuse cashmere sweater,” this would allow Google to show not simply the parent cashmere sweater product listing to them (which could be another color and risk losing the sale), but would allow Google to show the variant for size (medium) as well as color (chartreuse) and material (cashmere) to match exactly what was searched.
⚠️ Warning about changing Item IDs:
When you set your Item ID format within Simprosys, ensure that you do not change it without good reason (or consulting with a Shopping Ads expert). The reason is that changing your Item ID completely resets the product history within Google Merchant Center, which is tracked through the Item ID.
There’s no major difference in selecting whichever of the Item ID formats in the beginning best suit you, but once you set the format and have accrued some data and investment in Google Ads, you do not want to change this again without having good reason; otherwise, you risk resetting your history in GMC for those products.
In fact, Simprosys has wisely made it impossible to accidentally change this within their app by an accidental click. On the other hand, if you ever have issues with continued product disapprovals for no apparent reason, changing the Item ID may eventually become your only option as it “resets” the product in Google’s database and gives it a fresh start in the world.

Troubleshooting tip: Once you’ve successfully set up your account, are you noticing odd html coming through in your descriptions? Deselect the checkbox pictured below so you’re not sending rich html descriptions. That’ll clear up any problematic html elements coming through in your finalized product.

The additional settings options are well-documented within Simprosys, and I’ve found their support responsive and helpful if you have additional questions.
With that, once your Simprosys app is set up, move on to Step #2.
Step #2 - Create a Google Merchant Center (GMC) account
In this next step, we’ll turn to Google Merchant Center (GMC). GMC is the processing unit of the product feed that prepares the order to be served through Google Ads.
To use a restaurant analogy, if the Product Feed is the food, GMC is the chef and Google Ads is the server dishing up the goodness to the consumer.
GMC needs to process the feed correctly, which is why an app like Simprosys or a third party agent needs to send it in the correct format to GMC.
Thankfully, GMC is a free service provided by Google in order to better facilitate the easy setup of product listings. They want you to use it and pay them money through ads, after all!
You can sign up and get started here, following the instructions as you walk through the service.

While the process is somewhat self-explanatory, there are a few important things to note when setting up your account:
- You need to ensure the programs for Google Shopping and Free Product Listings are set up and live.
![manage programs google merchant center]()
- Your URL is tied to your GMC account and must be verified. Everything for Google ties into this URL, and you’ll be given a few options to do this.
- Make sure to fill out your Business Information section accurately and exhaustively. We recently had a client GMC suspended for a couple of days until we learned it was because they had moved locations and did not update their physical business address in GMC (and it also did not match their website).
- Shipping and Tax information should be added here; it’s a pain, but important and can result in account approval issues. Ensure this is accurate to your site. Google will manually check this with test orders from a variety of locations and slap a warning on your account if these do not match.
- Ensure you add your logos and brand colors in at this time. This will be important later, as Google utilizes this information to design some of its dynamic ads.
- Enable the Dynamic Remarketing program (we will come back to this later).
![enable dynamic remarketing]()


Don’t worry about a product feed yet; let’s save that for a future step. Now that Google Merchant Center is live, it’s time to move on to Google Ads.
Step #3 - Create a Google Ads account
Many brands have already created a Google Ads account, so I won’t spend too much time on this step.
Here are the basics.
- Set up a Google Ads account by visiting ads.google.com and filling out your information.
- Instead of following the on-screen prompts, select “Switch to Expert Mode.” This allows you to have additional controls within your account.
![create a google ads account]()
- Next, you will see the option to create a campaign. We’ll save this for later, so select the link to skip this step.
- Finish the basic business settings, and you’ll be ushered into your brand new Google Ads account!
![view your google ads account]()


We’ll discuss specifics of conversion tracking and campaign creation in future steps, but for now continue on to the next step below.
Step #4 - Link Google Ads to GMC
You have GMC and you have your Google Ads account. Now it’s time to sync it all together.
Go back to GMC and navigate in the settings to “Linked Accounts.” Click “Link account” and follow the on-screen prompts to send a link request to your Google Ads account by grabbing the 10-digit Google Ads CID (at the top right corner of your Google Ads account. It looks like a phone number).

Once this is done, navigate back to Google Ads in the Linked Accounts section of settings to approve the request sent from GMC.


You need to do both steps, one in GMC and one in Google Ads, in order to finalize the link.
Now you have successfully selected your Shopping Feed App, synced it with the Google Merchant Center that you created, linked Google Ads and GMC together, and you’re ready to delve into the more technical steps next.
SECTION II - GOOGLE MERCHANT CENTER
Step #5 - Choose products within Simprosys to send to GMC
As we move forward with the setup, it’s time to head back to Simprosys and select our products to be sent to GMC.
Which products? While it may seem like you’d want to select all of your products, that’s not necessarily the case.
First, there will be products in Shopify that you don’t want to be sent to Google Shopping for a number of reasons. Maybe you have some products created for a specific reason, with duplicates live on Shopify. I’m not here to judge the cleanliness of your Shopify backend, but I am here to let you know you need to have a clean feed sent to GMC or it’ll cause issues in the future.
Because of this, you may not want to set your Simprosys app to pull from “All Products” but rather direct the app to only pull products from a specific collection.

The collections themselves can be automated, or manually created (in this screenshot, our client created a collection titled “googleshopping,” which I like because it’s clear to all what the collection is for), but they allow you to only send specific products from your database into Simprosys, which will then be sent to GMC and finally on to Google Shopping.

🤔 3 questions to ask yourself when selecting products
- How many of your products should you send to Simprosys? This is a trick question, as this answer has changed since Google began featuring free product listings on their properties.
- The real question to ask is, how many of your products should you advertise? You want to send all of your eligible products to Google Merchant Center and then filter within GMC or Google Ads to the subset you actually want to advertise.
- Why would you only advertise some of your products? You may find that you do not have enough budget when beginning to feature your entire catalogue. This is not abnormal, as you want to ensure your most important products receive as much budget as they need, even if that means other products are not able to be advertised. Select the product brand, category, or even a self-selection of what you anticipate as your top sellers as the products you actually want to advertise.
Then, ensure all products are sent to Google Merchant Center, and simply target the specific products you want to be advertised in your Google Ads campaigns to ensure you have segmented out the correct products. The free product listings are worth this effort, however.

Google released these last year (originally titled: Surfaces Across Google) and they include metrics within Google Merchant Center that give you insight into traffic from these free listings. If you send all of your eligible products to these product listings, you have the opportunity to appear for free for all of those products.
We'll discuss paid ads product structure as it pertains to our Shopping campaigns in a future step, so don’t worry about that at this point. Once you've determined which products you're sending to Simprosys, make the selection, re-sync the feed, and move on to the next step!
Step #6 - Optimize the products within Simprosys
Now that you’ve sent your products into Simprosys from Shopify, it’s time to optimize them. What technological geekery will optimization include, and how could you possibly find time to do it with everything else you have going on right now?!
Don’t worry, there are just a few things you need to do immediately to take your feed to the next level, and you can pursue deeper levels of feed geekery in the future if you find the time, or so desire (and eventually you can hire someone to do that for you).
Here’s what to focus on immediately in optimizing your products for Google Shopping:
First, navigate to the Manage Products page in Simprosys to see a list of your products.

Next, there are two ways to make edits within Simprosys. You can either edit individual products or bulk edit a group of products (this is one of the things I like the most about Simprosys). You’ll likely have instances where you need to utilize both individual and bulk editing, but for the sake of efficiency, utilize bulk editing as often as possible.
What are the Product feed attributes to focus optimizations on first?
The nice thing is that Simprosys automatically ensures your required attributes are set, but there are other (recommended) attributes to include as well, and you may want to update some of the required attributes.
The attributes worth optimizing (note: I left out the attributes that are required and would simply be matched to your Shopify feed for certain industries without changing, such as gender for apparel) are:
-
Product Title: This is one of the most visible elements of your ad, and it is weighted by Google’s algorithms in order to better target search terms people type in for your products. You may need to edit these individually, but unless you have a lot of products (there are creative bulk ways to accomplish this) it is a worthy venture since it is such an important attribute.
In thinking of optimizing your product title, you want to weight the most important (and most likely to be searched) words towards the front. DataFeedWatch put out an excellent guide on different title formats for different industries, which can be found here: 8 Tried & Tested Tactics to Optimize Your Google Shopping Title -
Product Type: Product Type is the internal way you categorize your products. Unlike Google Product Category, there is no “correct” category to map to, you are free to fill this attribute with any values you like (as long as they are in the correct format).
Product Type is often left out of feeds, more from ignorance than intention. However, it is an important attribute, as it gives Google contextual signals for how your products are related to one another, which helps in its algorithms.
This is usually an attribute I like to bulk edit. You can do that simply by downloading the appropriate spreadsheet in the bulk edits section for the products you have selected (see screenshot below), editing the Product Types for each product, and re-uploading it from the “Import List” button at the top of the Products page in Simprosys

💡 Advanced Tip: With Product Type, Google recommends you have at least 3 Tiers, and you make them descriptive. Instead of “couch” in your product type field for a sofa, your Product Type should look more like this:
Modern Sofas > Leather Luxury Sofas > Leather Recliner Sofas
-
Google Product Category: This category used to be a required attribute, but it has since been demoted by Google in terms of importance. It is easy to set within the app, however, and still gives Google some contextual signals, so it is worth setting.
This can be found again in the Bulk Edit Option, ensuring the specific products you want to edit at one time are selected. Unlike Product Type, there are set “Google Product Categories” and you will need to find the closest category to the products you are mapping.
-
Description: Whereas, Description used to be a field more resigned to keyword stuffing than actually beneficial, it has increased in importance with the advent of Smart Shopping Campaigns since Google may now select to show the Product Description in some Display Network product ads. Because of this, it is advisable to ensure the Description contains the readable, purposeful product benefits towards the beginning of the Description.
Per usual, ensure no sales language, or “junk” content, gets added into the Descriptions by default based on how the product is imported into Simprosys. This will help prevent disapprovals in the future (though there is no guarantee against the inevitable disapproval once in a while!).
There are many other attributes, and additional focus on any of them you observe is wise. However, optimizing these four within Simprosys will give you the biggest bang for your immediate buck based on how simple they are to edit.
Step #7 - Deal with any product disapprovals
Once you've set up and optimized your feed, it’s time to monitor and fix any product disapprovals. These are important to address quickly because they can have a direct impact on how closely Google’s filters analyze your Google Merchant Center account.
As it has been explained to me by Google Product specialists in the past, there are different layers of Google’s filtering system in Google Merchant Center that analyze an account for potential policy violations.
There are the high level filters and the more aggressive (often manual) filters, and the more an account demonstrates itself to be a problem to Google with unresolved issues, or previous violations, the more Google will monitor and police that account.

I've heard many brand owners express frustration at a GMC policy violation they need to fix on a product when they can see a direct competitor engaged in the exact behavior, yet still live on Google Shopping. This is most likely because Google is not monitoring their account as closely at this time as they are your account. It is unfortunate, but it is the reality of the current system.
That means, as much as possible, it is important to take care of product disapprovals, even if that means excluding them from the feed for the time being. This is where utilizing a collection within Shopify rather than simply sending “all products” can be helpful, because you can easily exclude specific products from being sent to Simprosys without dropping them from Shopify.
💡 Advanced Tip: You can also submit a supplemental feed for the disapproved products with the “excluded_destination” assigned to those individual products. This tells Google you do not want those products to be sent to Google Shopping or any other channels you include in that field.
Make sure to keep an eye on individual product disapprovals and also on the Account level disapprovals, as these can be easy to miss (located on another tab in the screenshot above). Finally, ensure you have notifications set up from Google as Google Merchant Center support often provides specific product examples and details on why a disapproval occurred. This can be valuable information in solving the issue.
By now, you've set up your feed, optimized it, fixed your product disapprovals, and you are now ready to actually advertise your products! Continue on to the next section for details on setting up your Google Ads campaigns.
SECTION II - GOOGLE ADS
Step #8 - Get conversion and audience tracking set up
In order to track sales to your Google Ads campaigns, as well as give the machine learning in Google Smart Shopping campaigns a fighting chance at kicking tail for your store, you will need to ensure you have conversion tracking and remarketing set up correctly on your store. This means you will need the following two elements installed:
- Google Ads global site tag
- Google Ads Event snippet
In order to find these, you will need to create a conversion action within Google Ads for your Transactions.
- Navigate to the Tools section and select “Conversions”
![navigate to the tools section of google ads and select conversions]()
- Click on the Blue Plus Button to Create a New Conversion
- Select the Conversion Category, in this case it will be a “Purchase”
![select the conversion category]()
- Select “Use different values” (you will set up the code to allow transactions to track different revenue values) and select “Every” rather than “One” since as an ecommerce store, you want to track if this customer makes multiple unique purchases.
![select use different values for each conversion]()
- Set the conversion window. The default of 30-Day Click Through and 1-Day View Through (VTC) is acceptable. This simply means that, if someone purchases within 30 days of clicking on an ad, or within one day of viewing an ad, it will be applied to the account (keep in mind VTC does not currently apply to Search or Shopping campaigns).
![set the conversion window]()
- Select your attribution model. The default selection is Last Click, however, I am a fan of Position-based (until your store has enough data for Data Driven Attribution). Position-based gives 40% credit to both the first and the last click, and then divides up the remaining 20% between the middle clicks.
This allows us to keep an eye on upper funnel sales sources, as well as bottom funnel. It's not perfect, but is my preferred ccommerce model until you can utilize DDA (Data-Driven Attribution), which uses Google machine learning to determine the best way to attribute value per visit. - Select the option to install the code yourself, or send to your developer. Now you are finally at the place where you can see the all-important Global Site tag and event snippet! Make sure your dev team sees this, and you’re on your way to tracking sales.
![install the tag yourself conversion action]()


🛍️ Installing the code on your Shopify store: There are numerous helpful walk-throughs already for this, so I'll simply mention it as an important step and point you in the right direction: Shopify Google Ads conversion tracking.
You'll want to ensure you make the conversion tag dynamic so it tracks the actual transaction amount whenever you make a sale from a Shopping Ad. This helps especially for automated bidding models such as Target ROAS, which depends on accurate revenue information.
If you elect to use Google Tag Manager for your tags, visit the Google Ads setup walk-through.
Google Dynamic Remarketing: in order to run Dynamic Remarketing you will need to first have the Google Ads global site tag and the event snippet set. Once this is finished, you can then follow these steps to tag your site for Dynamic Remarketing.
💡 Advanced Tips: Make sure you add transaction IDs to the Data Layer as a variable, so you avoid accidental duplicate transaction recording, and also add the optional Dynamic Remarketing events and parameters, as they will give additional signals to Google’s automation to help the campaigns, such as Smart Shopping, make even smarter targeting decisions.
Step #9 - Create audiences within Google Ads
For our next step, we’re going to start something that we won’t use right away, but that will begin helping us immediately. We need to create a few remarketing lists within Google Ads so we can begin filling the lists with users in order to use them in the campaigns we eventually set up.
If you utilize Smart Shopping campaigns, then the campaigns automatically select the users within the lists you will create as they determine when and to whom they will serve ads.
If you utilize Standard Shopping campaigns, then you'll need to select which lists to apply to the campaigns, with the option of increasing or decreasing bids based on your eventual measured success with those specific lists.
You may, for instance, want to tell Google to always bid up any previous site visitors by 25% of your Max CPC simply because those people are already familiar with your brand. You are moving them further down the marketing funnel, per se.

💡 Advanced Tip: In order to use a remarketing list on the Google Display Network, you need at least 100 users on the list. In order to use the same list on the Search Network, you need 1,000 users on the list. Why? I don’t know, but I think it has something to do with Google privacy policies. 🤷🏻♂️ Regardless, it is what it is.
How do you create a remarketing audience? There are two ways: you either create them through Google Ads or Google Analytics. Google Analytics gives you additional user targeting and behavior options beyond Google Ads, and my preference is to typically create an audience there to import to Google Ads.
However, for the sake of limiting this post to Google Ads, we will walk through setting up an audience within the Google Ads UI:
- Navigate in the Toolbar to the Audiences tab.
![audience manager google ads navigation]()
- Select the Website Visitors option. At a later time when you have gained some proficiency, you can also experiment with the additional audiences shown in the screenshot. I would especially call your attention to the Customer list option, as that allows you to import a list of customer email addresses you own so you can target individuals already in your database, not simply site visitors.
![website visitors remarketing]()
- Create the Name of the List and select the list type. As seen in the screenshot, I prefer to name my lists clearly so I always know what they are when I see them in the UI. I would recommend using the option for “Visitors of a page who did not visit another page” and then separately tracking customers who check out and those who do not. In this example, we would be targeting all people who visited the site (without buying anything) sometime during the past 30 days.
![Create the Name of the List and select the list type]()
- Set the lookback period and membership duration. If you want to automatically pre-fill the list, then you can select this option (recommended unless you have a great reason for wanting a fresh start with your audience), and you will also select the time frame here that your list will include people.


💡 Advanced Tip: In the past at ZATO, we used to create a variety of different time frame lists for the same audience. So we would typically have: All Visits 540, All Visits 180, All Visits 90, All Visits 30, All Visits 7 in the same account. We would then utilize bid modifiers, set higher for the smaller time frames. The idea was that people were more valuable if they were just at your site yesterday, than if they visited a month (or year) ago. Now, because of smart bidding and Google’s automation in Shopping Ads (specifically Smart Shopping), it makes more sense to lower the number of lists, and let Google find anyone from a longer time frame who also falls into the other signals they are using in the auction. This is reflected in the lists I will recommend you build first below.
Which remarketing audiences should you create first? I would recommend starting with the following:
- All Visits - 540 Days - No Sales
- All Visits - 7 Days - No Sales
- Cart Abandonment - 30 Days (people who visit the cart page without converting)
- Checkout Abandonment - 30 Days (people who make it into the checkout, beyond the cart page, without converting)
- All Visits Resulting in a Sale - 540 Days
- All Visits Resulting in a Sale - 30 Days
Once you are ready to try some other lists within Google Analytics, here are some other lists I like to build out for our Shopify clients:
- All Visits to 3 or more product pages without purchasing (they were interested, but didn’t pull the trigger).
- All Visits on site longer than 10 or 15 minutes without purchasing (you may want to check your site times in making this decision. Basically, you want to target people who spent a decent amount of time on your site, but did not purchase).
- All Product Category pages, typically based on your Main Nav. This allows you to lump visitors into lists based on what product category they are interested in (bonus, this also works great for Search Ads, because you can then coordinate your Landing Pages and Ad text with these specific remarketing lists).
Once you have these audiences created and they have begun to fill, it’s time to start building!
Step #10 - Strategize shopping campaign organization
It's tempting to create a Shopping campaign, assign it to all products, push it live, and saunter away just as Walter White left the scene of Ken’s exploding car.
However, just as the destruction from Ken’s car caused trauma, so potentially could one’s non-strategized Shopping campaign, even if that trauma is simply unrealized revenue.
In order to set up a solid Shopping account, we need to do two things. We need to determine (1) what campaign type to utilize, and (2) how to segment our products.
Which campaign type?
When it comes to Shopping Ads, there are two campaign types: Standard and Smart Shopping.

-
Standard Shopping: Google has been increasing its insistence on the Smart Shopping type, and even noted on separate occasions that engineering resources have shifted away from Standard Shopping, so it is difficult to determine how many days the Standard Shopping Campaign type has left.
Regardless, the Standard Shopping Campaign still has value… particularly in the early days of a new brand’s usage of Google Shopping. This is because it (a) focuses almost entirely on the Google Search Network (so it is targeting people who are specifically searching for your products, or solutions that your products can meet), and (b) allows you to collect data on your users.
That data is vital to your understanding of who your audience is and how they are searching, since you can use it to help guide other business efforts such as email headlines, SEO titles, and even which pages to build out next. Smart Shopping, unfortunately, does not include this data that can be helpful, so it can be a trade-off.
💡 Advanced Tip: There are many different ways of segmenting Standard Shopping Campaigns, but arguably the most utilized and successful is in utilizing the various priority settings within Standard Shopping Campaigns to allow the advertiser to target individual search terms by where they fall in the purchase funnel. Specific details and a walk-through of this strategy can be found here: Does Google Shopping Query Filtering Still Work in 2020?
-
Smart Shopping: Smart Shopping Campaigns (SSC) are Google’s newest campaign type in the Shopping world, and it uses machine learning to target customers on Search, GDN (Google Display Network), Gmail, and YouTube.
Smart Shopping has been somewhat controversial in the PPC world since it does not include data reported back to the advertiser, such as which search terms people used, how many ad visitors were remarketing (they have been to your site before) compared to upper funnel, or which advertising channels were used in the ads (Youtube vs Search Network, etc.).
However, as others will debate, SSC has demonstrated itself to generally be successful at hitting revenue and ROAS (Return on Ad Spend) targets. This is undoubtedly because SSC is able to use millions of data signals not available to the human managing a more manually controlled campaign type, as well as its ability to find lower cost auctions within the Google Display Network and YouTube that also are not available to the Standard Shopping campaign practitioner.
Much ink has been spilt already on this debate (if you want to dig in to some arguments, you can read this discussion I engaged in with another ecommerce PPCer on the matter of Data Transparency: Should Smart Shopping Include More Data? My Rebuttal to The Rebuttal), so we will avoid the debate in this post other than to recommend you consider the points brought out in the previous paragraphs.
For the sake of keeping this already lengthy post succinct, we'll focus specifically on speed and efficiency in going live, which means we’ll discuss Smart Shopping Campaigns only, and point you to additional resources if you want to pursue your own Standard Shopping build as well.
How should you segment your products?
Now that we have determined we will be utilizing Smart Shopping Campaigns for the sake of this article (keeping in mind the hesitation with data loss in new brands presented above), how should we segment out our products?
This is where your product attributes such as Product Type, Product Brand, and Custom Labels will come in handy. Product Type is basically your product categorization, which is often how people make purchase decisions as it is. If your audience is shopping for a new dining room table, it is somewhat unlikely (though not impossible) they will be enticed by a sofa.
This, along with the ad we will create in our final step which is tied directly to the products being sold, has me generally interested in using my Product Types for my campaigns.
On the other hand, you may be advertising apparel whose audience can be fairly Brand loyal. It may make more sense to segment out between, say, Nike and Adidas. Ideally, with enough products, segmenting by Brand and Product Type can be beneficial in allowing you to help target the machine and your ad creative to more tightly controlled segments.

This brings up an important point. If we are moving forward with Smart Shopping, then we need to ensure the product segments we select will feed enough data back into the system to enable the machine to make the best choices to optimize for success in the future.
This is crucial because with Smart Shopping it is better to under-segment rather than over-segment.
Still we have found some success (at times) in testing individual products in their own Smart Shopping Campaigns at ZATO, since we can design the ads to be focused solely on the products in question. As noted before, there needs to be enough data for those individual products to allow this test to work.
That being said, there is no singular, perfect way to segment out your products. Identify the manner in which your audience shops, identify whether you have the creative and content for your ad to support your segmentation, ensure there will be enough traffic and data for your selected product segment… and then push it live and make adjustments over time!
That will be our final step, creating a Smart Shopping Campaign(s) and going live.
Step #11 - Create your shopping campaign(s)
It’s the moment you've been waiting for! You've done the hard work of setup and optimization and now it is time to get those ads running.
Based on the previous step in which we determined to use Smart Shopping Campaigns in this walk-through, we will now walk through setting up a Smart Shopping Campaign so you can experience the thrill of seeing your products live on Google and ready to bring in the sales! Let’s break it down:
1. Click on the Blue Plus Button and select “New Campaign." 
2. Select the option to “create a campaign without a goal’s guidance."
Selecting this option will keep you out of Google recommended path so you see all of the possible settings options.
3. Select Google Shopping (not the Smart Campaign option).
4. Select your Country of Sale (matched to your Feed), choose Smart Shopping Campaigns, and click “Continue." 
5. Name your campaign.
My campaign naming recommendation is to keep it short but clear, so you always know at a glance what is in each campaign. It's also important to maintain consistent naming parameters so you can easily set filters within Google Ads or Analytics.
I tend to prefer to begin with the Channel - Type - “What is in the campaign” - Location (typically country code). 
💡 Advanced Tip: You'll notice there's a Local Products option under the advanced settings link. As a brick-and-mortar retailer, this is relevant to you since you sell products in physical stores. If that's the case, I recommend you check out Local Inventory Ads.
6. Select account-level conversions.
For the sake of efficiency, we won’t get into Campaign-level conversions since, in this author’s opinion, they are lacking in functionality (more can be read here on New Customer Acquisition Goals in Smart Shopping if you're interested in my concerns). Based on what we set up previously, selecting Account-level conversions will keep everything on track here.

7. Set the target ROAS.
There are two options for bidding in Smart Shopping: Maximize Conversions or Target ROAS.
If you want to aim at a specific ROAS target, then you can enter a percentage in here. Because the campaign is in the learning stage with no campaign or even account level data for it to analyze, we prefer to start it aiming at Maximize Conversions with no specific ROAS target to encourage the Learning stage to grow in intelligence more quickly.
We have found that, even without a specific ROAS, campaigns may perform better than expected so don’t think that refusing to set a ROAS target means you are guaranteed to lose money.

💡 Advanced Tips:
- It's crucial to understand that the ROAS and Budget targets in Smart Shopping Campaigns are more directional than hard targets. You may want to adjust ROAS targets more or less aggressively to communicate to the machine to back off or surge traffic regardless of how closely the machine is hitting your ROAS Targets (again, it could be beating what you have in play, which we see happens semi-regularly). This can be more akin to a frustrating dance with a clumsy partner than a sharpshooting contest, so adjust your expectations accordingly.
- For Google’s purposes, ROAS is calculated by the percentage rather than the whole number. So if you want to aim at a 3 ROAS, then you would enter 300% into the field.
![enter 300% into target roas field]()
- If you don't set any Target ROAS and choose Maximize Conversions, the default ROAS Google aims for is 200%.

8. Set your target budget, and move on to the next step.

Budgets are difficult to set in completely new accounts, since you do not have history to rely on, and you can only get so much data on the Search side from tools like Keyword Planner to anticipate average CPCs and traffic.
That, unfortunately, becomes almost meaningless to Smart Shopping Campaigns, which include more Channels and lower CPCs than Search campaigns.
I've found that there is a balance here between what a Brand can afford to invest and what is actually possible in the marketplace. Hiring a good consultant can get you somewhat close to a starting number, as much of this is based on market data for estimated traffic based on average prices of potential auctions.
At the end of the day, you may just have to determine what you can afford to invest and stick with that number, adjusting the number of products or targeting location accordingly. This is why it is important to determine the number of products you will begin advertising.
If you hope to begin with $2000/mo in advertising for your Smart Shopping campaign, but you want to advertise 8,107 products, then you will be telling the machine to spread itself out across too many potential products without spending enough to ever accrue meaningful data in order to make smart optimizations.
You are setting it up for failure. Remember, with PPC, increasing spend means you are either paying more for premium auctions (which tend to convert better), or you are paying more because you are getting more traffic in the auctions you are eligible for (because you are getting higher placement), or you are getting more traffic from new products now that you have additional investment.
Gathering the data enough to allow the machine to make wise decisions of which products will work for which audiences in which auctions takes time and money.
For the sake of closing out this section, let’s say that you decide to advertise only Trainers in Smart Shopping Campaigns to test them out. You have 80 trainers across 6 different brands, and you have a budget of $5,000 for the next 3 months. That will give you approximately $55/day for this Shopping campaign. Remember, you can always change this as you go.

You may see that the campaign is converting well and you want to increase your daily budget, or you may see that traffic is low and you may even consider adding in another shoe type. Much of the time, Shopping Campaigns (and more broadly, PPC) is simply a matter of figuring it out and knowing which changes to make to adapt to the continued learnings you receive as you first start running campaigns. Nobody said it was easy!
9. Select the products you want to target in this campaign.
You can select these products now or after the campaign is complete. If you set them up now, I recommend checking them before going live to make sure your actual product segment was subdivided as you set here.

10. Create your SSC ad.
The time has finally come to build the SSC ad! This is a crucial step for Smart Shopping Campaigns and one that is new in the realm of Shopping Ads. In the past, Shopping Ads remained fairly consistent in their format: image, title, price, brand, ratings, etc.

However, Smart Shopping Campaigns are a dynamic form of ad that allows Google to determine the size, style, color, and format of its ads based on where they show and to whom they are showing. This means the ad creative is more important than ever, since your ad needs to act as a distracting piece on a website or YouTube ad by pulling someone away from their intention to observe your product and click through to your website.
In other words, don’t simply toss a few markety-sounding phrases into your ad. Make it represent your product or brand well.
💡 Advanced Tip: If Google has product specific information on the person (for instance, specific products they have visited on your website) viewing the ad, then they will show “dynamic product” ads which typically have multiple clickable products in the same ad. If there is no specific product information for the person viewing your product on the Display Network, then the elements you add in (discussed below) will be shown to the visitor in a variety of formats.
There are several elements to the SSC ad.

- Logo: This pulls the logo from your Merchant Center account that we set up previously, and now you can see examples of what this will look like in the preview tool. You may want to consider removing small text from the logo if that makes it unclear or unreadable.
- Image: This is your chance to visually represent your product or brand well. Select an image that represents the specific product grouping you have selected for this campaign. If this campaign is advertising Nike trainers, perhaps a lifestyle image of athletes wearing the trainers would be a good fit here.
-
Video: Consider using either a punchy brand video ad you may have invested in or a dedicated video highlighting the specific benefits of the products advertised within this campaign. Follow basic YouTube principles here with shorter video ads, including a hook within the first 3 sentences to capture and keep attention.
![ad video]()
- Headlines: There is a Short headline and a Long headline that should include the most important information about this product segment. Keep in mind that the Headlines can be shown with the Description below, so ensure they do not duplicate content.
- Description: In this field, you get the chance to go into additional details not included in your Headlines. I like to typically preserve short, factual statements for the Description to support the more attractional tone in the Headline. For instance, you may want to communicate in the Description that you offer a 90-Day Money-Back Guarantee and Free Shipping, along with other elements.
- Final URL: Some of the ads have clickable elements that are not products, and these will navigate to the Final URL you select here. We try to keep this tied to the higher level taxonomy we are advertising in this campaign. If the campaign is targeting Nike Trainers, then this could go to the page on your site for Nike Trainers: https://yoursite.com/trainers/nike. Once your ad is complete, save it and go check out the campaign for final adjustments!

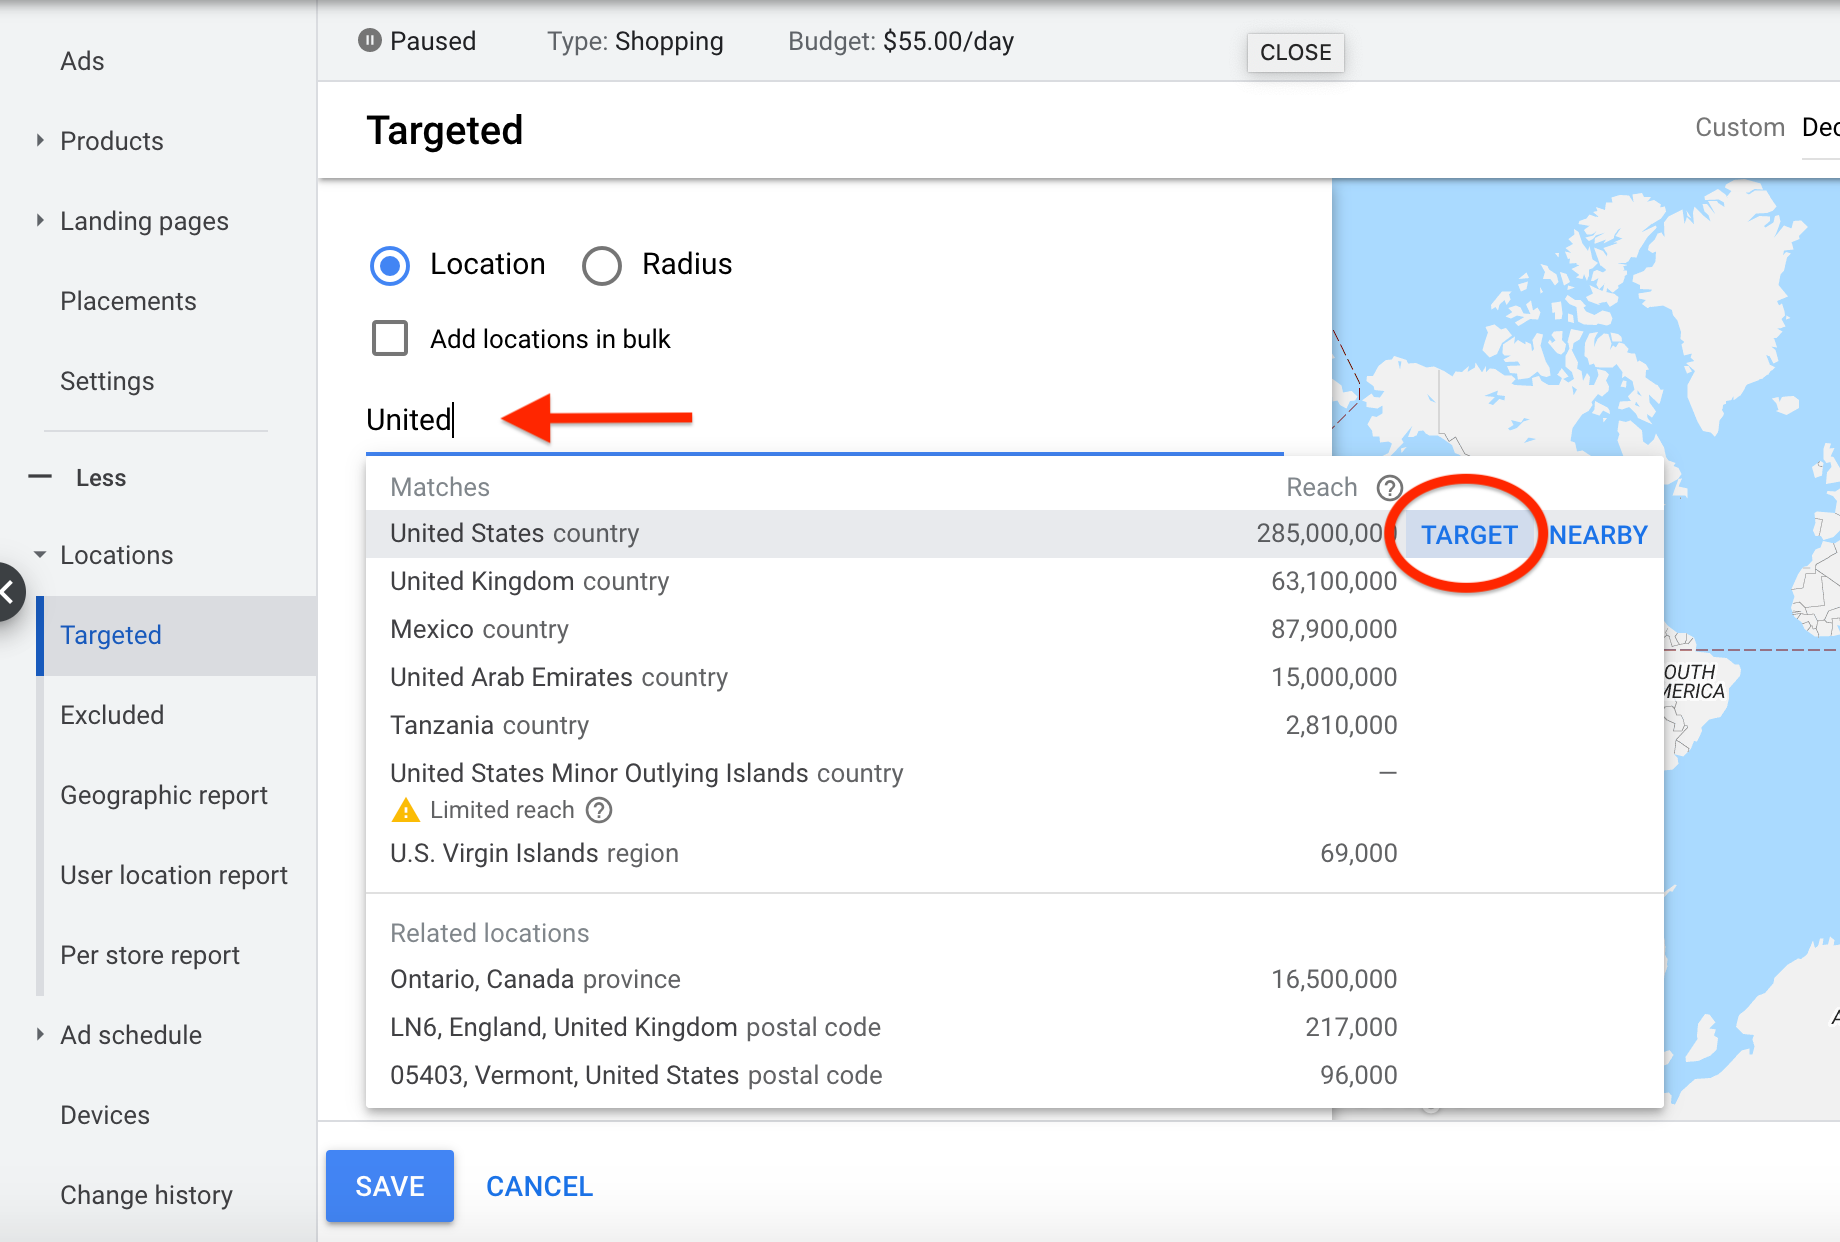
11. Edit your targeted location.
In this step, we need to ensure our campaign is targeting the same physical location of ad viewers as our product feed is set to target.
This is relatively simple, but it will save you some money from Google showing your ads in various countries around the world to people who, for whatever reason, are determined to be your target audience, but not actually people to whom you can ship your products.

12. Check your work and push live!
We're almost finished! Make sure to double check your ROAS target, your budgets, your locations, your feed, and your product groups. Are you sure you are targeting the product groups you segmented out?
Make sure it does not say “All products” in the product groups tab, as that means your segmentation did not work and you will need to subdivide within the UI according to Product Type to find your Nike Trainers.


Once you've checked everything, fixed any errors, and finalized each of the previous steps, you can sit back and let a big sigh escape your lips.
You did it!
You've successfully pushed your Shopping Campaigns live and your products are now out there for anyone to buy.
I can’t wait to hear how things are going!
SECTION IV - TROUBLESHOOTING
You've successfully set up, from A to Z, your very own Shopping Ads campaign… and now you are having trouble with it. What next?
Let me begin by saying that a brief Quad-Tiered Troubleshooting section in this article will never be a match for a professional who can dig into the account to identify the issue for herself.
However, I've found these four issues to be the most common, and hopefully they answer your questions right from the start.
No (or incorrect) products in Google Merchant Center?
“I have set everything up and linked everything, and yet I’m not seeing products in Google Merchant Center!”
Or
“I am seeing the wrong products in GMC!”
Check Simprosys first. Are you sure you selected the correct products to be sent from your Shopify store to the app? Is it possible you selected the wrong Collection?
Did you check the link between Simprosys and Shopify? Did you actually pay for the Simprosys app, and aren’t accidentally still on a free test run?
Is there a feed container in Google Merchant Center (on the Feeds tab) set up (this should happen automatically if you connected Simprosys and Shopify correctly)?
Are you sure your products are in stock?
No traffic?
I have products in Merchant Center, but I’m not getting any traffic to my Google Shopping campaign!
When did you push everything live? Was it less than 48 hours ago? If so, give it a little time. It should happen within a few hours, but sometimes things are delayed so give plenty of time to ensure it’s not simply the system preparing your feed and syncing with Google Ads.
Did you check the Products tab in Google Ads for that specific campaign? Do you actually have products in that campaign, or are there none attached? If you see products in Google Merchant Center but not in your Google Ads campaign, you may need to verify the Product Groups that you set up to ensure you are targeting the correct product subset.
Also, make sure you have products set to the specific feed attribute you are targeting. If you want to send Product_Type_1, but you never added values for Product Type in Simprosys, then no products will be in Product_Type_1 in Google Ads.
Have you ensured there are no suspensions or warnings on the Diagnostics tab in GMC? Make sure your products are eligible to be served and are not disapproved for policy violations.
Have you checked Impressions or just clicks? If you are getting impressions but no clicks, you may need to simply increase your budget and/or decrease your ROAS target.
Low traffic?
“I have products in GMC, and I’m getting impressions, but it’s very low traffic. Why am I only getting a few clicks to my Shopping campaign?”
If you are getting lower traffic than desired, you may need to simply increase your budget and/or decrease your ROAS target. This will signal to Google that you want to be more aggressive in the auctions for which you are eligible.
If you are getting impressions, that means your ads are actually serving, but it could be that your campaigns are too segmented. This means you aren’t giving the machines enough data to work with, so they’re in essence “working” by saying they could not hit your targets and thus not showing. You may need to add more products into your Shopping campaign if raising budget and decreasing the ROAS target are not working.
Traffic, but no sales?
“I am getting plenty of traffic and spending a bit of money, but I’m not getting the sales I want. What gives?”
First of all, who says “what gives”? Joking aside, the question to ask is whether you are seeing no sales at all or only some sales. This is an important question because, if you are seeing no sales, then the first place you should check is your conversion tracking to ensure it is set up correctly. It is possible you are seeing no sales because the code was not placed correctly, and fixing this will solve your issue.
If it is not a conversion code issue, then how old is the campaign? We typically see a new Smart Shopping campaign take a week or two to become profitable, and it can take even longer than this. As we noted previously, this can be a frustration but is a reality of any optimization process since a decision cannot be made without enough time, data, and money.
If you are convinced this is not just the campaign’s learning period, then perhaps you should try a new segmentation of products. Try resetting the machine but testing a new setup. Instead of targeting Nike trainers, perhaps test hiking boots from multiple brands with dedicated ads and creative. Perhaps the machine doesn’t have enough data to work with, or perhaps there are other things going on that are making this particular setup difficult for the machine to figure out the best path to hitting your goals.
If you continue to have issues, perhaps you should consider experimenting with a more advanced structure in Standard Shopping so you can more tightly control your budget to the specific search terms you want to target in the beginning of your efforts on Search. This is particularly a good idea if you are breaking into an innovative new vertical in which there is little previous data from any company, yet you have specific search terms on which you want to advertise. Standard Query filtering campaigns will allow you to control this situation better than Smart Shopping.
Finally, it could be that you are in a complex industry and may need to hire a professional who can consult with you and perhaps even help manage expectations as to your budget, desired return, and competition in your specific market.
Conclusion
Give yourself a pat on the back, a high five, and a raise. You made it through this exceptionally long post, or you just scrolle d to the bottom and happened to read this sentence. Either way, I hope this has been informative and I can’t wait to hear how Google Shopping is helping your business grow!