

At some point in their journey, almost every online entrepreneur will need to use a landing page to promote their products, capture marketing leads, or launch a marketing campaign. Developers have a unique opportunity to support their clients with their expertise in design when this need arises.
As we learned in a recent Web Design and Development Blog post, ‘user-centered design’ is critical when crafting a landing page aimed at a specific target audience, and developers should create layouts and page functionality with your client’s customers in mind.
Thankfully, with thoughtful use of static sections, it’s possible to build customizable landing pages on Shopify, which can be populated with content by your clients. This means developers can focus on the design of the page, while your clients are empowered to decide which products and copy will appear on the landing page.
Building landing pages on Shopify is also useful for any developers who need a portfolio site to showcase their work and attract new clients. Custom sections could be added to a landing page displaying case studies, demonstrating past projects, and outlining your skills.
In this article, I’ll demonstrate how to customize existing themes and build a landing page template that your clients can populate with store content. I’ll also show you how to ensure landing pages are flexible with Liquid tags and section settings, as well as giving your clients the most options when running campaigns.
For more tools to help your development process, check out our list of favorite Sublime text plugins.
Grow your business with the Shopify Partner Program
Whether you offer marketing, customization, or web design and development services, the Shopify Partner Program will set you up for success. Join for free and access revenue share opportunities, tools to grow your business, and a passionate commerce community.
Sign upCreating a custom page template
The first step to creating a landing page for your theme is to create a unique Liquid template file for this specific campaign. By using an alternative template, you can create a particular landing page Liquid file which clients can assign to a page from the admin, and customize from the theme editor.
There are two ways to achieve this. If I’m using Slate, I can manually create a new file and copy and paste the existing page.liquid code into this file, and save it in the templates folder. If I’m using the admin template editor, I can add a new template, and the editor automatically pulls in the default template code.
For this example, I’d like my additional elements to appear below the text I’d enter onto this page, so any new sections will be included below the Liquid object {{ page.content }}. However, feel free to experiment with different positionings of page content and sections to find the most suitable arrangement for your clients.
NOTE: If a client is looking to host multiple landing pages, you will need to create a different page template for each landing page, with its own unique sections. An existing limitation of sections is that a change made to one section will affect all iterations of that section. This means that separate sections would need to be created in order to avoid changes on one section affecting other versions.
Adding content to the landing page
Next, we’ll need to determine what exact kind of content your client would like to display on their landing page. Perhaps this is a specific product, or a new collection they would like to highlight, or a blog post they would like to direct people towards.
In this example, I am going to focus on a particular collection, and so I will be adding a featured collection section to this page. Almost all themes will have an existing featured collection section, usually accessed through the theme editor, on the home page.
These existing sections are generally dynamic sections, which allows them to be added to the home page, but they can also be added to other pages as static sections. Similar to snippets, you can include a section in a template file using the section Liquid tag. This is most commonly used for static sections like headers and footers, but we can use these to build a landing page.
The theme I am using in this example is Narrative, which has an existing dynamic section for showcasing a featured collection. Once I’ve found this Liquid file in the sections folder, I can copy and paste this code into a new section and give it an appropriate name, such as fall-featured-collection.liquid.
Now I can turn this into a static section by removing the presets from within the section settings. In my case, this is the part of the JSON array I would need to remove from the bottom of the section:
This can now be added to the custom page template we created, using the Liquid tag {% section 'fall-featured-collection' %}
.
You Might Also Like: How to Create Your First Shopify Theme Section.
Including a newsletter on the landing page
A newsletter sign-up form is often one of the key components of a landing page, as clients could be driving their audience to the page to collect leads.
Once we have found our theme’s existing newsletter section, we can follow the same process of turning a dynamic section into a static section. We’ll need to create a new section containing the code of the newsletter section, and then remove the presets so that it’s a static section that can be included manually in our custom page template.
With the newsletter section however, we can add an option to hide or display the newsletter, to give your client the choice of showing this form. It’s possible that clients might prefer to focus on products or a different call to action, so giving this choice allows your client to make this decision themselves.
By using Liquid’s control flow tags with section settings, we can create the ability to hide or display a section based on the settings of that section. The rule we can create could look like this:
{% if section.settings.show_newsletter == true %}
  code for newsletter
{% endif %}
Next we’ll create a checkbox in the section settings that correspond with the show_newsletter attribute. This will be used to turn on and off visibility of the newsletter section from the theme editor:
"type": "checkbox",
"id": "show_newsletter",
"label": "Show newsletter sign up",
"default": true
You Might Also Like: How to Use Alternate Templates in Shopify Theme Development.
Call to action on the landing page
One of the most common features of a landing page is a call to action button, which allows clients to drive visitor engagement to specific products, or carry out a specific activity, like creating an account or accessing content.
Most themes would generally not have a specific section for a call to action, but it’s possible to create our own custom section. We’ve explored this previously on the Web Design and Development Blog.
While there might not be a natively supported call to action section within your existing theme, it’s important to use the default class names for buttons when creating them, to ensure they are styled consistently throughout the theme.
For this example, I’m using Narrative, and the secondary style button fits the page I’m creating, so I’ll be using the class of btn--secondary when designing the section. The classes or IDs you would use could be different depending on the theme.
Within the section I’ve added a header which a merchant could add text to, above the call to action button. The copy for the button itself, and where the button links to, can be assigned on the section settings from the theme editor. When this is all set up, this is what the code for my call to action section would look like:
Again, we will add section settings that will allow clients to hide or display this section. This gives more flexibility to merchants when they’re deciding what's important to show on the landing page.
In this section, I’ve also added a text field above the button, in case there’s some copy your client would need to add. This will be useful if your call to action requires any additional instructions.
Find your new favorite Markdown editor in our roundup.
Bringing it all together on a custom page template
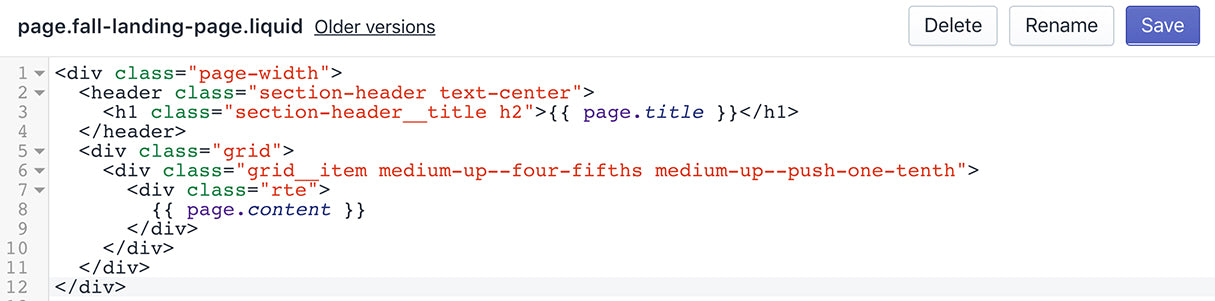
Now that we’ve created some static sections, we’ll need to include them on the custom page template created earlier. As mentioned previously, we use section tags to add these sections to our template, eg: {% section 'fall-featured-collection' %}.
Once the section tags for the three sections we created are added, the page.fall-landing-page.liquid template will look like this:
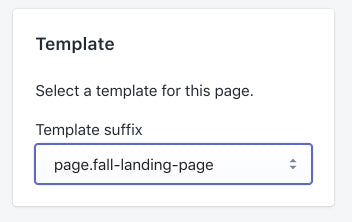
Now when your client is creating their landing page, they can choose the specific landing template they need from the admin:
Hiding the header and footer on your landing page
Another option to consider for designing landing pages is to remove the header navigation and footer from the page. This reduces the number of options visitors have, and places focus instead on the page content and call to action.
It’s possible to use Liquid’s control-flow tags to set up conditions that will stop the header and footer from loading on our newly created landing page. This also has the added benefit of improving page-loading speeds.
In the case of our example, we can use an unless tag to include a header section only when the current page is not the landing page. We would add this condition to our theme.liquid file, where the header section is included as {% section 'header' %}.
To achieve this effect, we’d set up an “unless statement” that targets the title of the page.liquid template file. We can use the contains operator to create a condition that loads a header, unless the title of our page template contains “landing-page”.
When this is set up, the code looks like this:
{% unless template.suffix contains "landing-page" %}
          {% section 'header' %}
     {% endunless %}
Similarly, the footer can be wrapped in an “unless statement” in the same theme.liquid file:
{% unless template.suffix contains "landing-page" %}
          {% section 'footer' %}
     {% endunless %}
Once this is implemented, the header top navigation and footer will not appear on your landing page, or pages with “landing-page” in the file name. The header and footer will however appear on all other pages of your storefront.
Customizing the landing page
Finally, this landing page can be populated with products, a newsletter sign up form, and a call to action by your clients when they navigate to the theme editor. The page selector allows users to access the specific landing page, and edit the settings associated with them.
Once you’ve set up the landing page with the types of static sections that your client requires, they can populate it with their collections, products, blog posts, and any other content they need. This less-opinionated approach means that your clients can decide which content is highlighted, while you can focus on designing a visually pleasing and high converting landing page.
To get an idea of how this landing page would look and feel to a customer, you can visit the example I built here.
Getting creative with landing pages
Feel free to experiment with your existing theme’s native sections, or create totally new sections with unique functionality and layouts. Some existing dynamic sections could be customized, to make them more suitable for landing pages.
As we saw, by adding in an option to display the section, clients can hide an element if they don’t need it on the landing page. This level of flexibility will be crucial to your clients when they’re launching their landing pages.
What will you build landing pages for? Let us know in the comments below!
