

For many online retailers, blog posts are unique opportunities to connect their brand with an audience, highlight specific products, or publicize current promotions. Developers can add value to a client’s store by adding functionality to article pages, and improving the user experience for blog subscribers.
Blogging as a content marketing technique has been around for a while, and there’s no sign that its value is diminishing anytime soon. Recently, Hubspot found that 55 percent of marketers say blog content creation is their top inbound marketing priority, while a Social Media Examiner report found that 58 percent of marketers said that “original written content” is the most important type of content, outdoing visuals and videos.
By improving the look and feel of article pages when building or customizing themes, Developers can boost conversion rates for their clients. With careful use of Liquid, it’s possible to enhance the usability of Shopify blog posts and unlock potential opportunities for success.
"By improving the look and feel of article pages when building or customizing themes, Developers can boost conversion rates for their clients."
In this article, I’ll demonstrate practical ways to customize blog article pages, by designing an intuitive approach for displaying custom names for authors, as well as improving navigation with previous and next buttons.
Learn more about building themes with Shopify Theme Kit.
Grow your business with the Shopify Partner Program
Whether you offer marketing, customization, or web design and development services, the Shopify Partner Program will set you up for success. Join for free and access revenue share opportunities, tools to grow your business, and a passionate commerce community.
Sign upUsing the blog and article objects
When building or customizing Shopify’s blog post templates, you’ll likely find yourself working with two different, yet related Liquid objects—article and blog. Let’s take a look at what properties we can access using these objects.
As it suggests, the article object relates to individual articles, and will allow you to output attributes of individual blog posts, such as article titles, article authors, and article publish dates. You can find a full list of available attributes for the article object in our Help Center.
The blog object relates to elements that are connected to specific blogs. In this context, you can see a blog being the ‘parent’ to its associated articles, or ‘children’. Very often a merchant could have a range of different blogs, which cover different topics.
For example, a client could have one blog for ‘News’, and another for ‘Case studies’, with different articles associated with each. The full list of attributes which apply to the blog object can be found in our Help Center.
In this tutorial we’ll look at how these objects can be used in different ways to optimize the experience for both your clients, and their buyers.
Find your new favorite Markdown editor in our roundup.
Displaying custom author names with tags
Sometimes, clients may want to write blog posts under an alias, or they may feature a guest blogger who they would like to credit as the author. By default, Shopify themes will display a blog post author based on staff admin accounts—but it’s possible to edit the article template and display any author name you would like.
Ideally, we’d like a custom name to appear on blog articles without a client needing to access the code of a theme, so we can set up some rules that will output a specific author name based on the tags that are associated with a blog post. This way, you can provide an experience to your clients which is as frictionless as possible.
Let’s imagine our client has a guest blogger called Ana Smyth, who contributes articles as part of our client’s content marketing strategy. By default, Ana would need an admin account in order for her name to be a selectable author name—but the client would rather display her name without assigning her an account.
The first step here would be to locate the Liquid object article.author, which returns the full name of the article’s author. If you are using a sectioned theme, this object will likely be in the article-template.liquid file within the Sections directory. Otherwise, you may find it in the article.liquid template file.
You will likely see something like the following, where your article.author object is contained:
      <span class="article__author">
      {{ article.author }}
      </span>
We’ll want to use control flow tags to add conditions which will overwrite the article.author and output a custom author name, when these specific conditions are met. In our case, we’d like these conditions to be related to the tags associated with the article.
We can use if Liquid tags to output our guest blogger’s name, Ana Smyth, as the author in the event that a blog post is tagged with ‘ana’. This means we could set up our control flow tags as follows:
      <span class="article__author">
       {% if article.tags contains ana%}
        <p>Ana Smyth</p>
       {% else %}
        {{ article.author }}
       {% endif %}
      </span>
You can also see that we have added an else tag, which allows a follow-on piece of code to execute if the previous condition is not met. This allows you to output the author assigned from the admin as a fallback if the blog post is not tagged with ‘ana’.
Now when Ana submits her article, we can add a tag of “ana” on the Edit article page:
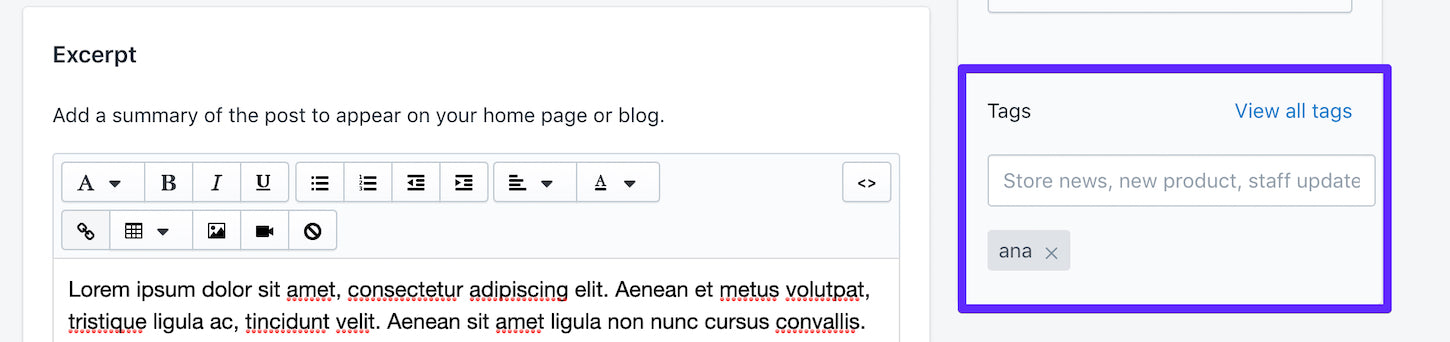
Once this is added, we can view the article and her name will appear as the article author:

If you have a range of different guest authors, you can add additional if conditions for each one and create corresponding blog tags. The same process would work for pseudonyms or generic brand names that your clients would like to display, without needing to create a specific staff account.
You might also like: How To Use Translation Keys To Create Internationalized Themes.
Using Liquid to add previous and next article buttons
When buyers are reading your client’s blog articles, they may want to continue reading similar articles, and reducing the barrier to accessing these will improve the usability of their online store. A setting for optional previous and next article buttons gives users another level of navigation, and allows them to easily browse more blog articles.
Thankfully the blog Liquid object has existing attributes that return the URLs of older or newer blog articles. We can link these object attributes to buttons on the article page, and use section settings to create an option to display the buttons.
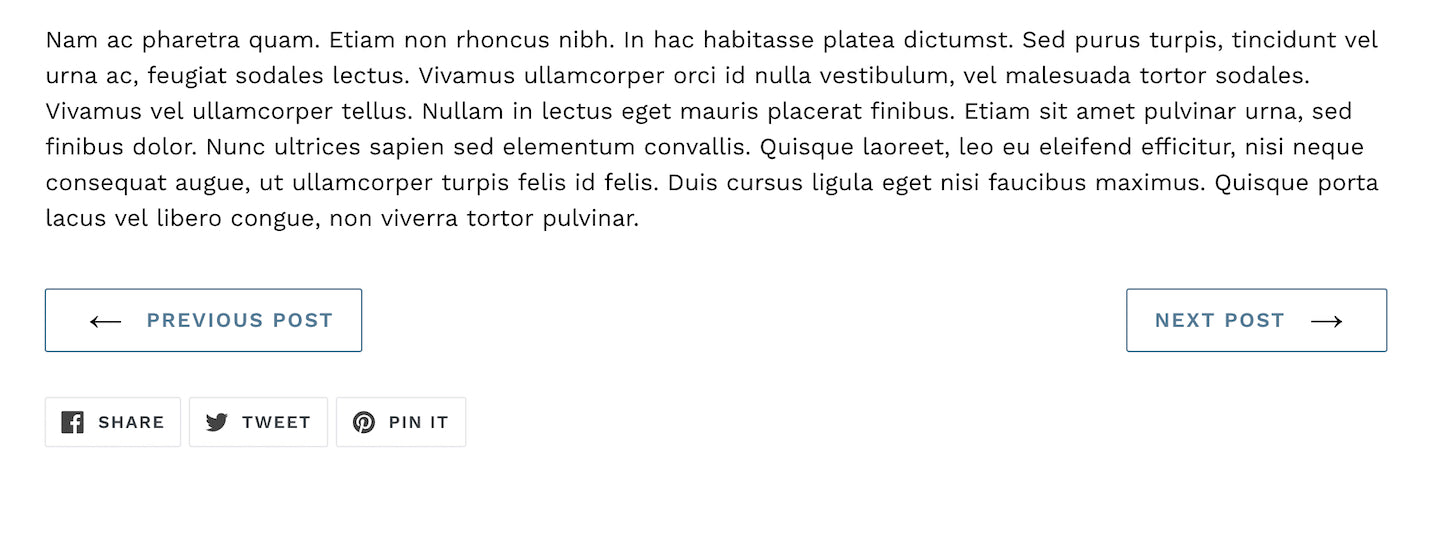
The first step here would be to create the buttons and include the link to the previous and next blog articles. In this case, I’ve added the container with the buttons and linked Liquid objects to my article-template.liquid section file, just above where the social sharing buttons are located. A basic container for these could look like:
You can see here that we have two link elements that are pointing to our Liquid objects, blog.previous_article and blog.next_article. These return the URLs for older and newer blog articles. These link elements have a class of btn. You can set up your own styling for this class, or add your own, in your theme’s stylesheet.
Once you’ve styled these elements to look and feel how you’d like, they could appear on the article page like this:
We’d like to go one step further here, however, and allow the client to choose if these buttons should appear. We can use section settings to create a option on the theme editor that allows your clients to toggle on and off the previous and next buttons.
Within the schema tags of the section file, we can define how settings for these buttons would appear on the theme editor. For a full explanation on how to create section settings, read this article on Shopify’s Web Design and Development Blog.
We would like to create a checkbox on the theme editor that can be used to toggle on and off the previous and next buttons, but we’d like to have them displayed on as default. In this case, the section settings could appear within the schema tags as follows:
   {
     "type": "checkbox",
     "id": "show_previous_next_buttons",
     "label": "Show previous and next buttons",
     "default": true
    },
Now we can wrap our previous and next buttons container in control flow tags that reference the the ID we created above. When it’s wrapped, the container could look like this:
Here we can see that the section setting ID corresponds with the ID we created within the schema setting. When this setting is toggled on from the theme editor, the code within the control flow tags—the previous and next buttons—will execute.
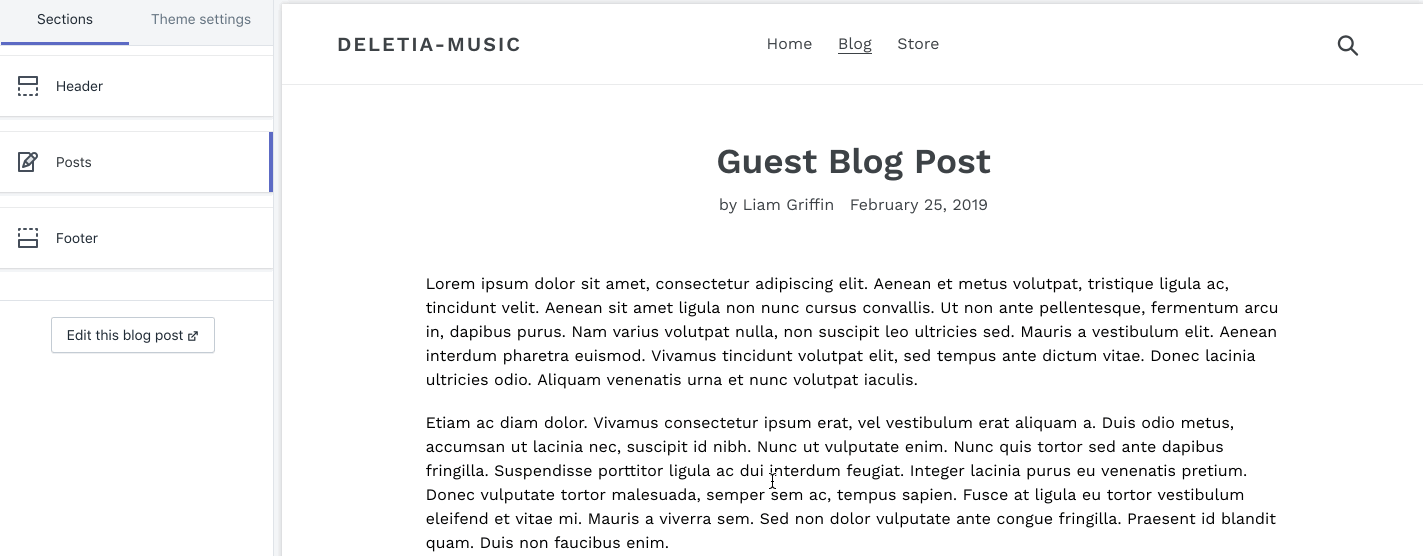
When we navigate to the theme editor and test this out, we’ll see the previous and next buttons appear or disappear when we toggle the settings:
Getting creative with blog articles
By making the blog article page more feature-rich, with intuitive settings and navigation, you can add additional value to your custom theme projects. You can also experiment with customizing existing dynamic sections and making them more suitable for blog posts.
Flexibility is crucial to your clients when they’re designing their blog posts, so if you can add functionality to article pages in a way that can be empowering for your clients, you can set them up for success.
Have you experimented with customizing Shopify blog templates? Tell us your experience in the comments below!
