

In May 2018, we announced Shopify’s Admin API in GraphQL, as a modern, powerful, and easier to use API for you to build on. Using GraphQL is an exciting way off interacting with APIs, and opens a whole world of new possibilities for app developers.
Whether you’re looking to efficiently retrieve information about a few different related objects, or even just get that one field of information without consuming a significant part of your REST call limit, there’s never been a better time to get up to speed on how to use our GraphQL Admin API.
To help you take advantage of all the possibilities offered by the Admin API in GraphQL, we’ve put together this learning kit. It will guide you through making various calls to the Shopify GraphQL Admin API, using the Insomnia API client.
Table of Contents
Build apps for Shopify merchants
Whether you want to build apps for the Shopify App Store, offer private app development services, or are looking for ways to grow your user base, the Shopify Partner Program will set you up for success. Join for free and access educational resources, developer preview environments, and recurring revenue share opportunities.
Sign up1. Prerequisites
In order to follow along with this walkthrough, you’ll need a few things:
- Your own private app that you’ve created on your store
- It will need read and write permissions to:
- Products
- Customers
- Orders
- DraftOrders
- Click on “Review disabled Admin API permissions” and scroll down to the bottom to find this last permission
- The Insomnia API client
- The Shopify GraphQL walkthrough Insomnia collection

Already a seasoned GraphQL veteran?
Head on over to the gist linked below to copy the requests directly without having to use Insomnia.
View gistHow to configure Insomnia
Once you’ve installed Insomnia, you’ll need to import the collection and ensure it is properly configured to make calls to your store using your API credentials. Below are the steps to do this.
Step 1: Import the collection
Once you’ve downloaded the walkthrough as a collection, you’ll need to import it into Insomnia.
Open the Import/Export window in Insomnia:

From the Data tab, browse to the collection:

Switch to the Shopify GraphQL workspace:

Step 2: Configure your environment variables
Environment variables are JSON key-value pairs that allow you to refer to values without having to write them out every time.
For our setup, we'll define two environment variables:
- The
storewe'll be interacting with - If your store is mydevstore.myshopify.com, enter “mydevstore” here
- The
access_tokenwe'll be using - This is your private app’s password, visible on that app’s page

These will enable you to re-use all the queries in this collection with different Shopify stores, just by changing your Insomnia environment variables.
You can set your environment variables by opening the Manage Environments window, and adding your details to the my-test-store-details sub-environment:


Step 3: Run the test query
Now it’s time to put it to the test.
In Insomnia, open the second query, under Shopify GraphQL Walkthrough > Insomnia Configuration, titled Run the rest query.
You should see at the top of the frame that we're using the "store" to build out the address for the endpoint.
You can also click Header at the top to see which headers we are sending with our request, including the access_token.
Hovering over either of these should show you the value that will be substituted into the request.
If you don’t see your values, ensure you have the right environment selected.

Once you've set up these two fields in your environment, try running the below query. You should get your shop’s name back.

2. Query structure examples
Let’s start by learning how we can structure our queries to get the most out of GraphQL.
QueryRoot objects
The QueryRoot represents easily accessible entry points into the GraphQL Admin API graph.
To use this page, search the page for a resource that interests you, and click through to learn more.
In our example, we'll take another look at the Shop resource, since it is a single object. Objects represent concepts such as the Shop, or a single Order, and contain data in fields.
In GraphQL, we always have to select what we want to have returned to us from the available fields. Alternatively, Insomnia will auto-complete valid fields as you type when selecting fields, so feel free to modify the query below to get more or less information back.
This query gets the Shop object, and specifies which fields we want returned.

You might notice that you get what you asked for, and then some. In the returned JSON payload, you should see two top level keys: “data,” and “extensions.”
- “Data” is always what you’ve just requested in your query
- “Extensions” is extra information that Shopify has added, such as the cost of your query
We’ll take a look a closer look at cost another time, so for now don’t worry about it.
Connections and edges
Connections are links between related objects. These allow you to make nested queries, gathering information from multiple objects by traversing their connections in a single GraphQL call.
When using connections, you’ll want to select the “edges” field. The edges field is an array of objects of the same type, such as orders on a shop. Once you’ve selected the edges, you’ll want to access the individual objects, via the node field.
On the node field, you can select the object fields that you want to get back. These fields will be selected on each object in the edges array.
Finally, when using a connection, you'll always need to select the number of objects you want returned (either first or last in the set). More on this below, in the Pagination section.
This query gets the product’s connection, which is available from the QueryRoot, and asks for the first three products. It selects edges, the node, and fields from each of the returned product objects.
Since products also have a variants connection, we repeat a similar process to get information on the first five variants on each of those products.

Filtering connections using the query parameter
On many connections, you'll want to filter down the list of edges to find the specific object that you are actually interested in (i.e. the specificnodes in the collection of edges).
You can find out which fields a connection supports filtering by referencing the query parameter on that connection's reference page in the docs. As for formatting the filter, the syntax follows the search-syntax guide.
This query finds the first ten orders that are fulfilled.

Single object by ID
Access through connections is great, but sometimes we might want something more direct.
Thankfully, we can also access an object directly through its GraphQL ID.
Looking at our QueryRoot documentation once again, we can see that there are multiple queries that require a single GraphQL ID as an input, and return that object. It’s good practice to always select the ID of any objects you’re querying, so that you can refer to it directly later on.
Note: Make sure that you're using a GraphQL ID here, and not just copy-pasting a REST ID.
The Migrating from REST guide has more information on obtaining GraphQL IDs from REST.
This query gets a single product via the ID, and specifies which fields we want returned.
You can easily get a product’s GraphQL ID for this query from the response to our previous "Connections and Edges" query. If you don't do this, you'll get a "null" response, since you're looking for a product ID that doesn't exist within your shop.

3. Mutation structure examples
Now that we know the ins and out of requesting data with GraphQL, we’ll tackle modifying it.
Basics and inputs
Mutations are the equivalent to REST’s POST/PUT/DELETE actions, and allow you to create and modify objects. They aren't tied directly to resources, so identifying what they will do usually comes down to naming convention and reading the documentation.
As with queries, in GraphQL you always have to select what data you want returned. Usually mutations will return the object that was created/modified, giving you a great opportunity to select the GraphQL ID (especially after a create), as well as verify any key data.
Finally, mutations always include a userErrors field. This field lets you know if anything is wrong with your mutation, and why it may not have been processed as expected.
You should always be selecting the userErrors field to help with your own troubleshooting. If nothing went wrong, the userErrors field will be empty.
This mutation creates a new customer. We're also passing in the input, which is a JSON object that contains the data we want our customer to have.
Mutations generally require inputs, and you can see which fields you can add to this input hash by checking the docs. First, look at the mutation and see what type of input it is expecting. Second, check that input's docs for all available fields. For example, the CustomerInput page in the Help Center lists all the available inputs.
Note: If you get an "Access Denied" error message, make sure your app has the Customer Read/Write Permission.
We'll select these fields as well, to confirm that they've been properly set.

Inputs v2
Mutation inputs can also require IDs, such as when creating an order.
From the previous mutation, you should have received the customer's GraphQL ID back after creation (if you selected it). Let's go ahead and use that to create a new draft order for this customer.
In order to properly format our input, we’ll refer to the reference docs for draftOrderCreate, DraftOrderInput, and DraftOrderLineItemInput.
Insomnia should be auto-completing field names from what's available to you, so the docs aren't totally necessary, as the schema is loaded by Insomnia automatically.
Note: If you get an "Access Denied" error message, make sure your app has the DraftOrders Read/Write Permission.

4. GraphQL variables
To accelerate and re-use our work, we’ll leverage GraphQL’s native implementation of variables.
Variables
GraphQL variables allow you to re-use the same queries/mutations with different arguments.
In Insomnia, query variables are separated into the lower section of the editor. For every example that follows, you'll have to add your values to the variables. Failure to do so means you'll be attempting to query my shop's data, and you should receive a "null" response.
For our example, let's find the draft order we just created, and use the ID that was returned to us as part of the variables.
Let's step through, line by line, and see how the variables get pulled into the query.

5. Pagination
In order to optimize the amount of data we're querying, let's take a look a how to iterate through objects in GraphQL.
What is pageInfo?
When requesting connections, we have to always request a subset of the full results, with either the "first" or "last" argument. This means that when looking at "orders," we'll only see the first X orders, and then be able to select which fields we want from those orders. This is great for items that show up in the first (or last) X, but how do we get more central elements?
On every connection, there is a "pageInfo" field, on the same level as edges. The pageInfo field contains information about the current subset of the connection that we've requested. Of note, we want to check out the "hasNextPage" field, which returns true if there are more elements in the connection that the current subset isn't showing.
This query gets the first 10 orders, and also asks if there are any more orders.

The cursor
For pagination, knowing that the next set (of X objects) in the connection exists won't be enough. We'll also have to find a way to refer to it.
Cursors are references to a node (object) within the context of a connection’s edges. By slightly modifying our query, we can ask for nodes before or after that cursor.
Let's take another look at our previous query, and also ask for the current edge's cursor.
This query gets the first 10 orders, and also asks if there are any more orders. It also asks for that edge's cursor.

The cursor v2
With the cursor, we're fully prepared to iterate through our whole connection.
On every connection, you can specify the "after" argument, which tells the server to return results to you after this specific cursor. Use the value that was returned for “cursor” in the previous query as the “after” argument in this query to get the next set of edges. Don’t forget to replace the included cursor variable value with your own.
Note: This is essentially equivalent to using "since_id" on the REST Admin API.
Let's take another look at our previous query, and also ask for the current edge's cursor.

6. Advanced
At this point, you’ve learned everything you need to get started on your GraphQL journey. If you’re still hungry for tips and tricks, read on.
Fragments: Handle multiple cases
Fragments are a GraphQL concept that allow you to build some flexibility directly into your query. They are marked by the "... on <TYPE>" syntax.
Using the "node" field on the QueryRoot, we can ask for specific objects by their ID. This returns us the object (under the “node” field or as edges under the “nodes” connection) as a node object with a basic type, which won't allow us to request any deeper info. However, using a fragment, we can ask for more specific type data if the node is of that type. This is especially useful on nodes that don't have an easy access point through the QueryRoot, such as a single lineItem.
Let's use everything we've learned so far to find out where a lineItem is stocked, so that we can fulfill it from that location.
This query uses the node QueryRoot field. We ask for an ID that we obtained from somewhere, such as a line item from our previous order or cursors query.

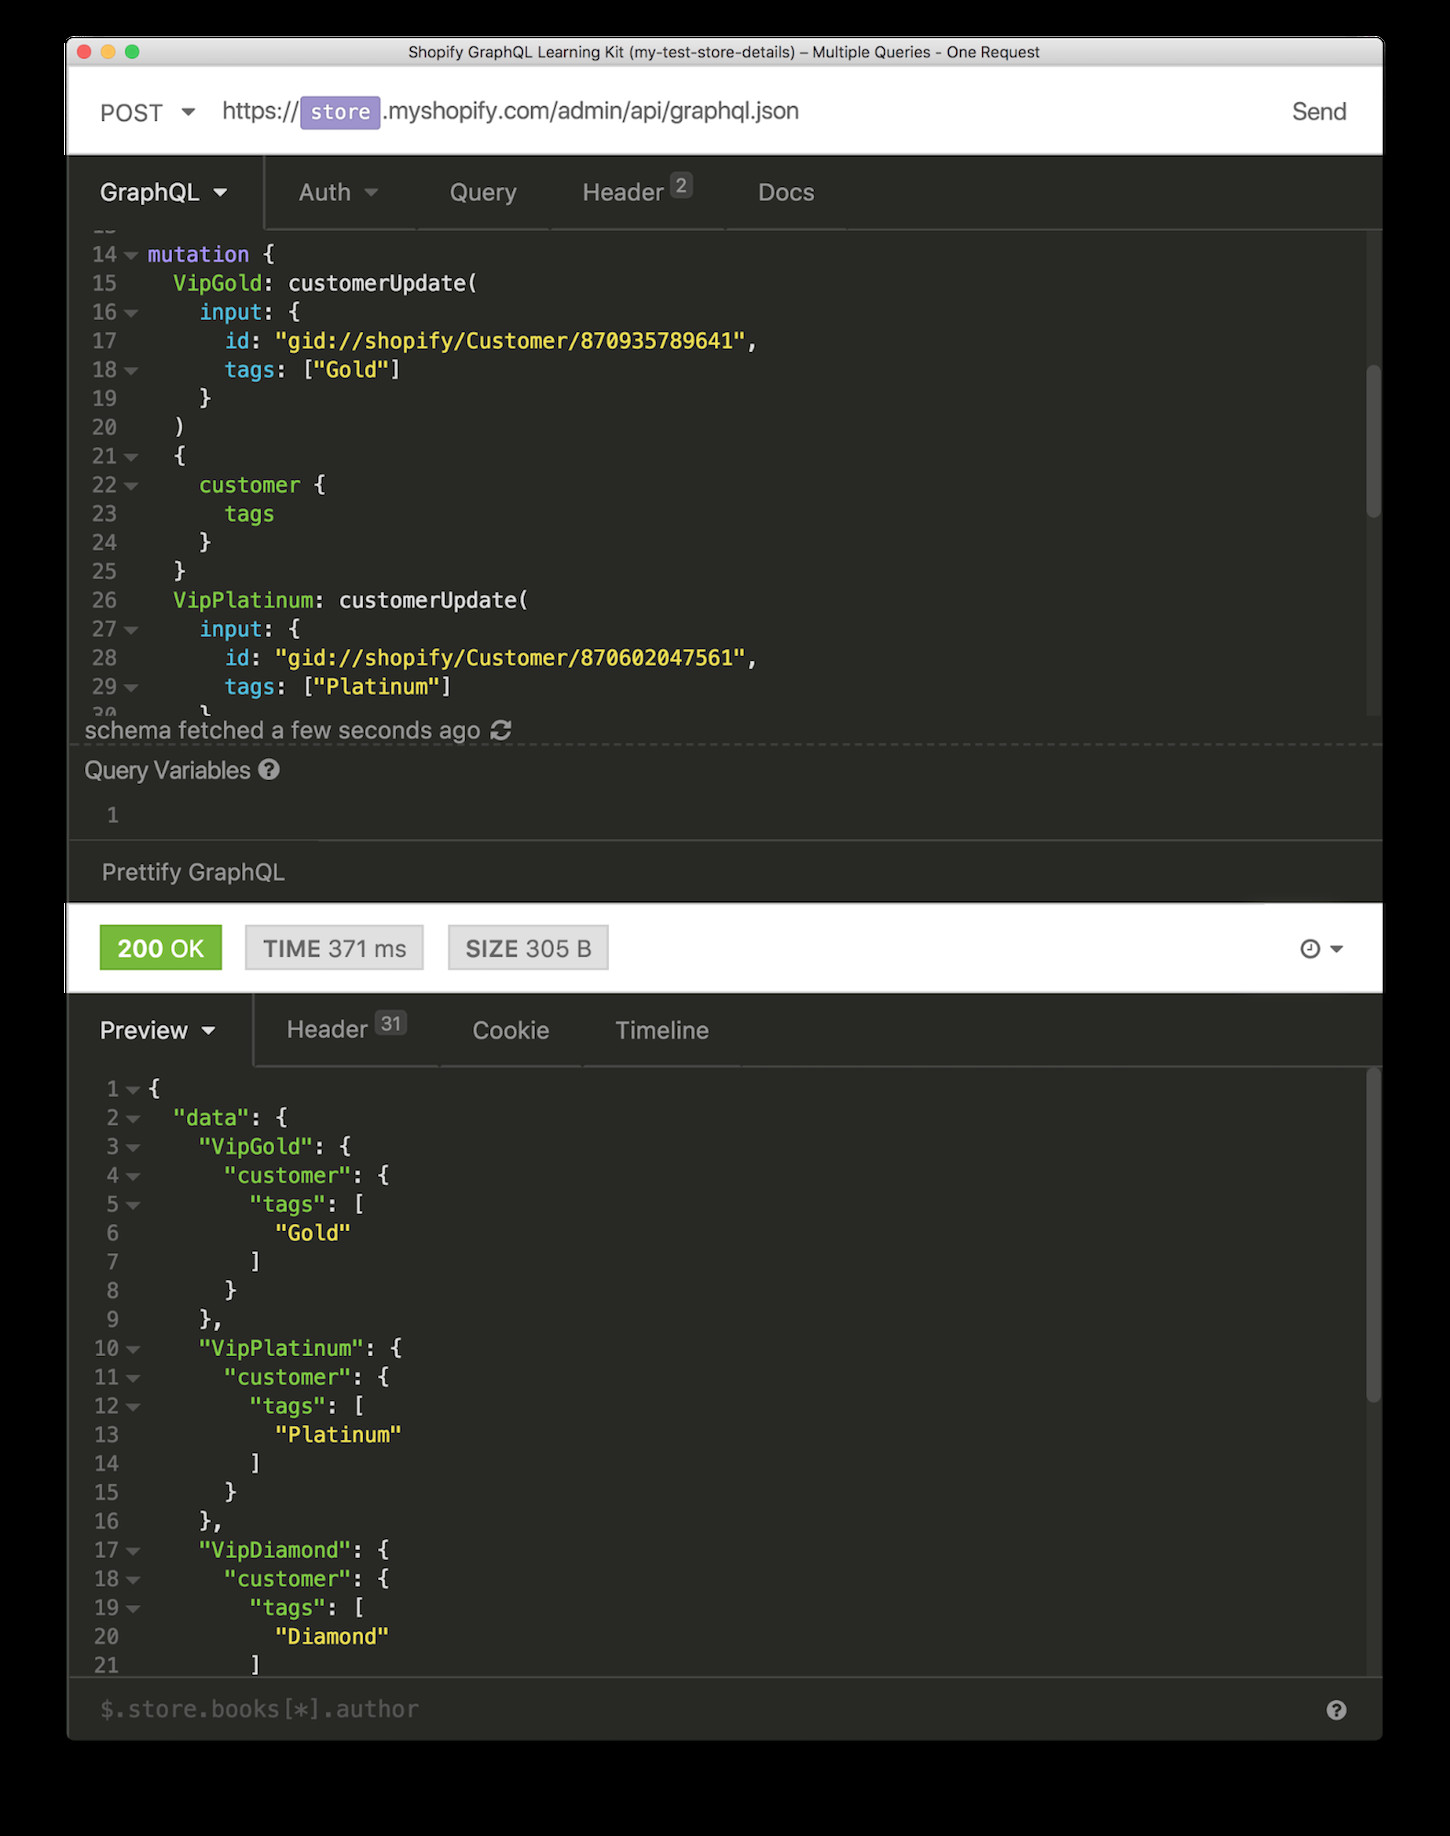
Multiple queries: One request
You can submit multiple queries or mutations in a single GraphQL request. This doesn't really have any rate-limiting benefits, as the query complexities are still added together, but for any other constraint that makes it easier for you to just send one multi-request, this is how to do it.
The key points are:
- Declare the type at the top, query or mutation
- Each individual query must be named
<your-custom-name>: <query/mutation-name-you-are-invoking> - The queries do not have to be the same
- Each individual query must select which fields it wants back
This multi-mutation sets three different tags on three different customers.
Add GraphQL to your app today
With this set of queries, you’ve seen how fast and flexible the Shopify GraphQL Admin API can be. With the ability to access data from multiple objects in a single call and getting you the specific data you need, GraphQL is guaranteed to improve your app’s capabilities, and save you a few REST calls along the way.
Build apps for Shopify merchants
Whether you want to build apps for the Shopify App Store, offer private app development services, or are looking for ways to grow your user base, the Shopify Partner Program will set you up for success. Join for free and access educational resources, developer preview environments, and recurring revenue share opportunities.
Sign up