Personalization is a powerful tool.
When it comes to building effective marketing campaigns, providing your customers with timely, relevant information is a key step in capturing their interest and bringing them back to your online store.
If you really want to give your campaigns a personal touch, consider running Dynamic Product Ads on Facebook.
Dynamic Product Ads allow you to serve ads to your customers featuring the exact products that they want to see. With the power of the Facebook Pixel, Dynamic Product Ads use behavioral information about visitors to your website to determine which products should be featured in your Facebook ads.
This process—also known as retargeting—is a highly effective way to turn one-time window shoppers into dedicated customers since website visitors who are served retargeted ads are 70% more likely to convert.
What is a Dynamic Product Ad?
Dynamic Product Ads are a way to display either single or multi-product Facebook ads to customers that have already visited your website, featuring the products that Facebook already knows your customers are interested in based on their behavior.
![facebook dynamic product ads facebook dynamic product ads]() Image credit: Facebook
Image credit: Facebook
You can use Dynamic Product Ads to target three different customer behaviors:
The products featured in the ad are entirely influenced by what your customers have already looked at, expressed interest in, or purchased previously which makes Dynamic Product Ads a highly personalized way to connect with your customers and showcase the products that they actually want to see.
Introducing Kit: your free virtual employee
Kit helps thousands of Shopify store owners market their online store. Hire Kit to drive sales and customer engagement with Facebook and Instagram ads, email marketing, social posting and more.
Hire Kit freeNot only do Dynamic Product Ads provide your campaigns with an added layer of personalization, but they also save you time and effort by letting you serve highly relevant Facebook ads to your customers without having to build hundreds of different ads for all of the products on your website.
How to set up Dynamic Product Ads on Facebook
While setting up Dynamic Product Ads might seem intimidating at first, it’s actually quite straightforward. To help you build your first set of Dynamic Product Ads, we’ve put together a step-by-step guide.
Let’s take a look.
1. Upload your product catalog to Facebook
To set up your first Dynamic Ad, you’ll need to use Business Manager to upload your online store’s product catalog to Facebook.
Your product catalog is a data file that lists all of the items from your store that you would like to display in your Facebook ads.
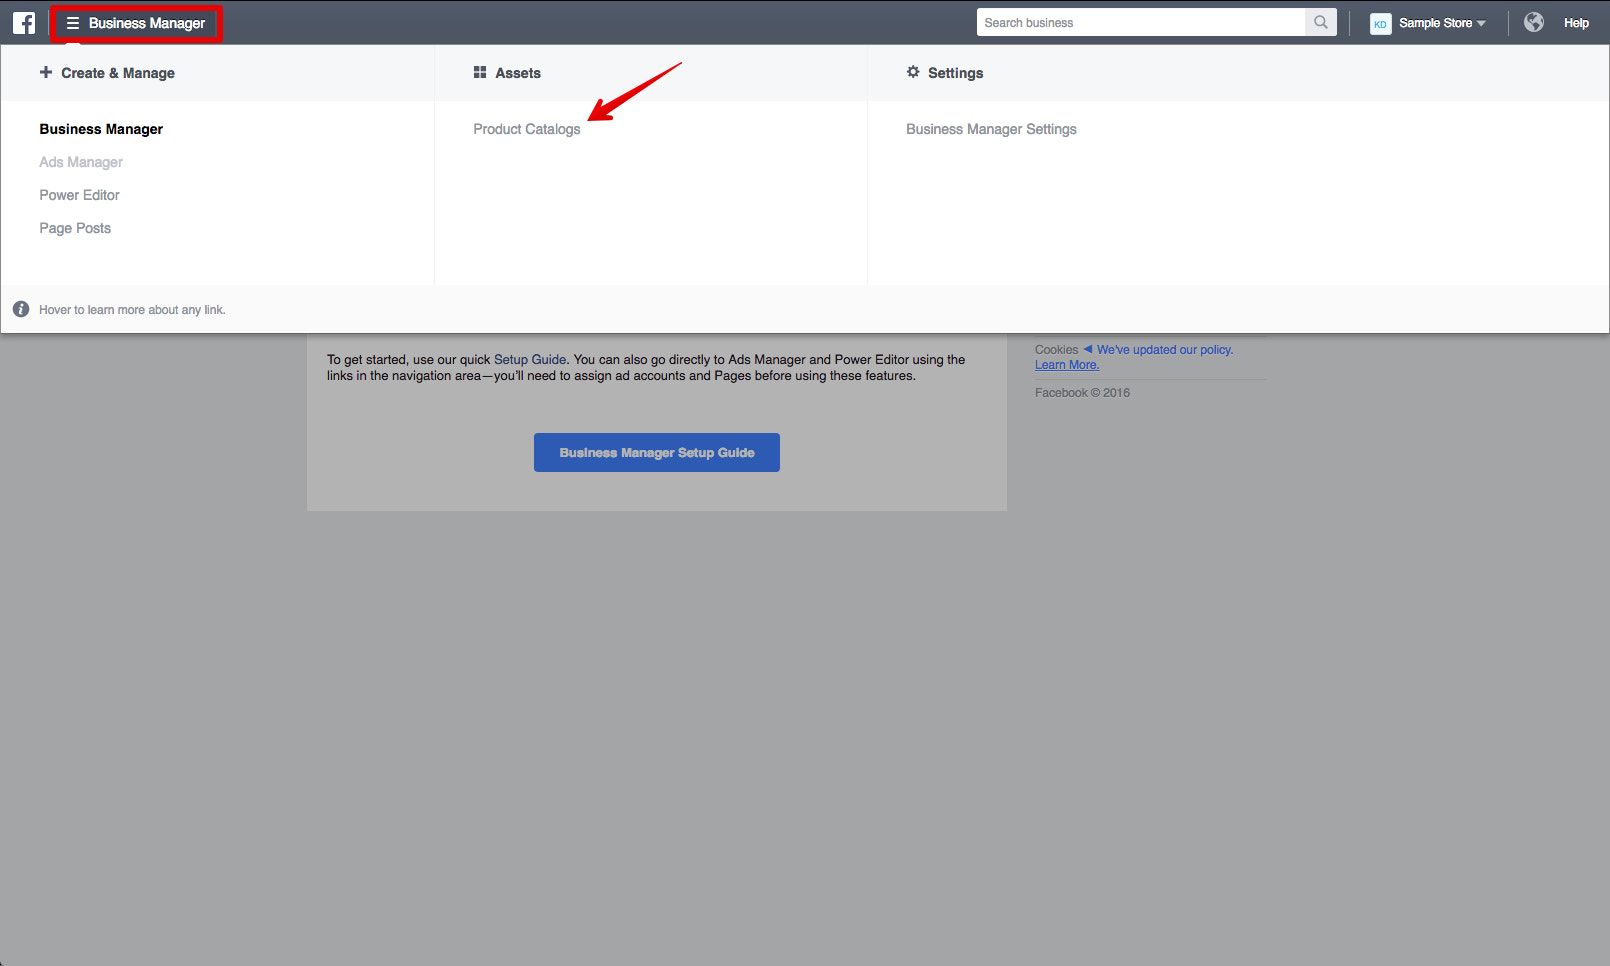 First, head to your Business Manager account. Click on “Business Manager” in the top left of the navigation bar and then click “Product Catalogs” under the “Assets” header.
 Now, click “Add New Product Catalog” and select “Create New Product Catalog” from the dropdown menu.
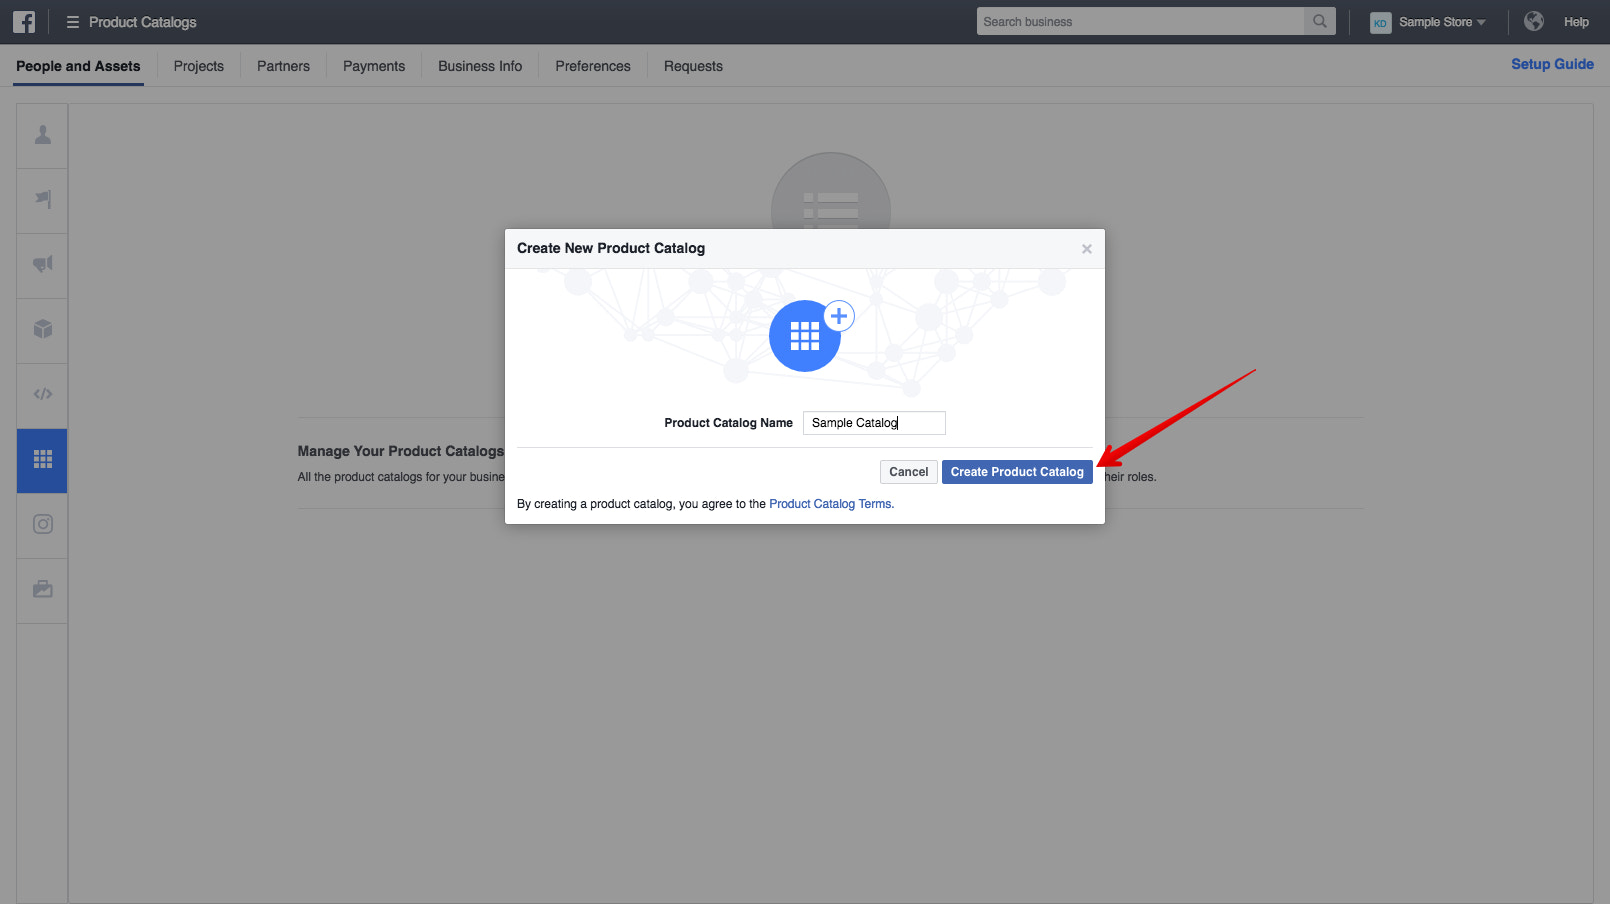 Give your product catalog a name (it’s usually good to stick with the name of your store here) and click “Create Product Catalog”.
Once you’ve created your product catalog, you’ll now need to add a product feed, so that your catalog can automatically generate your product listings.
A product feed is a list of products from your online store. You can create multiple product feeds to represent different categories of products from your online store, such as products that are only available in certain regions or products that cater to specific demographics.
![product catalog example product catalog example]() Image credit: Facebook
Image credit: Facebook
Before we move on to the next step, you’ll need to create a product feed for your online store. Product feeds are essentially spreadsheets that list off all of the details of your products and they can be CSV, TSV, RSS XML, or ATOM XML files.
If you own a Shopify store, you can set up your product feed using the Facebook Product Feed app from the Shopify App Store.

Free Reading List: Social Media Marketing Tactics
Want to learn more about how social media can help drive sales? Download our free, curated list of high-impact articles.
Get our Social Media Marketing Tactics reading list delivered right to your inbox.
Almost there: please enter your email below to gain instant access.
We'll also send you updates on new educational guides and success stories from the Shopify newsletter. We hate SPAM and promise to keep your email address safe.
Your product feed must follow strict formatting rules and contain a set of required fields to work properly. To get a better idea of how you should set up your product feed, take a look at the example feeds created by Facebook’s support team.
After creating your product feed, you’ll need to host it using FTP or upload it to a cloud storage site like Dropbox or Google Drive. If you’re using the Facebook Product Feed app, you won’t need to host it anywhere because the app takes care of that part for you.
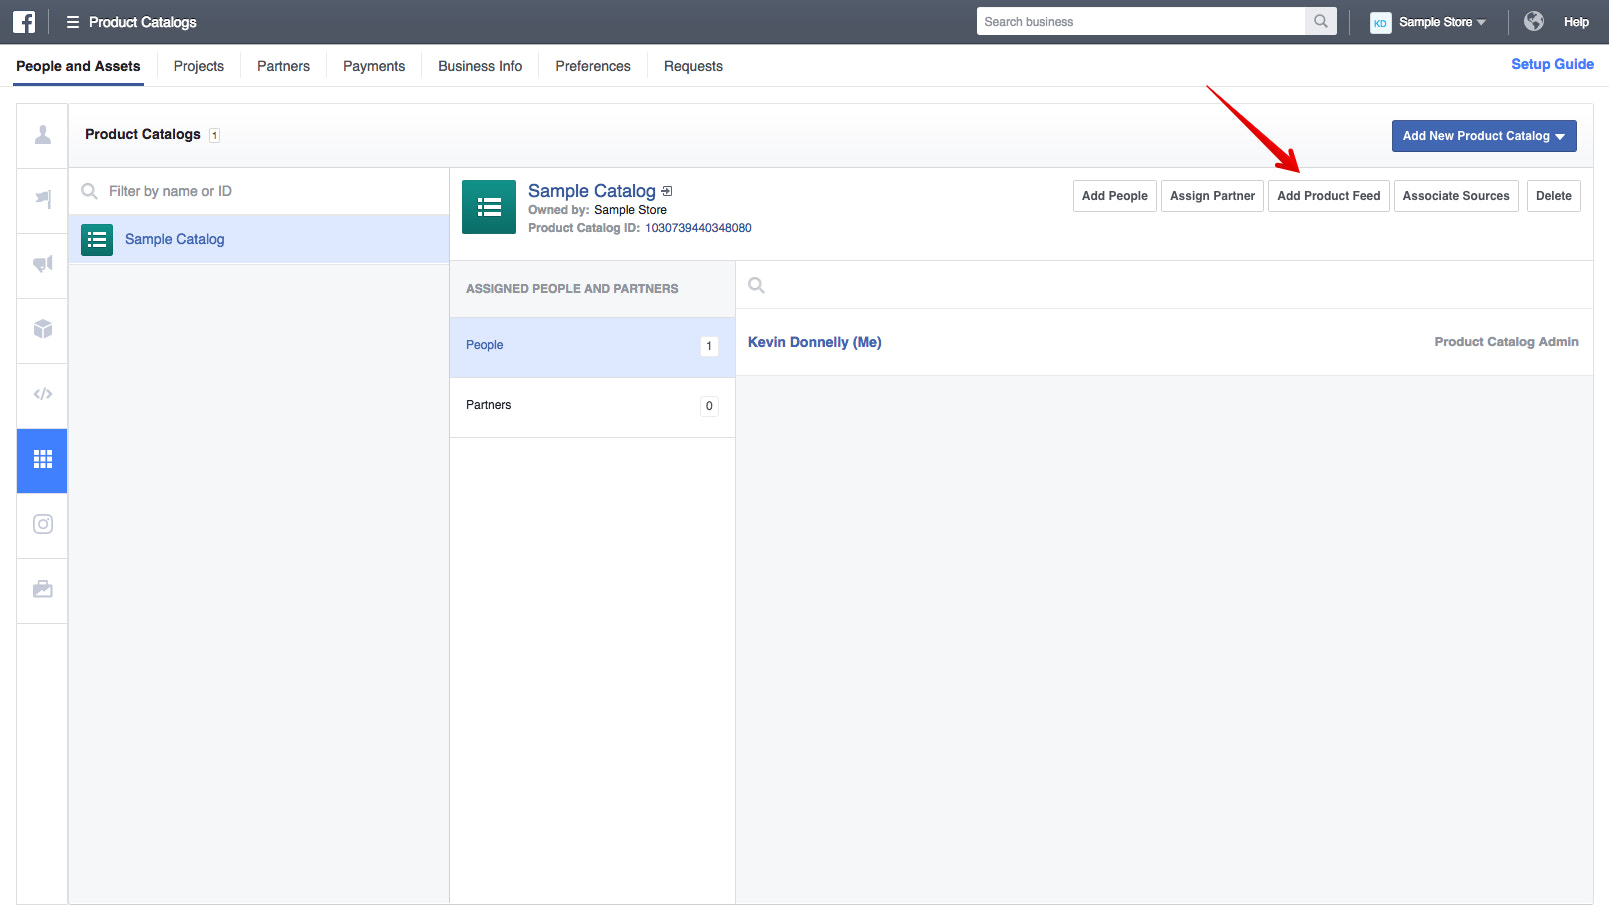 Once you’ve uploaded your product feed to the cloud, go to “Product Catalogs” and click “Add Product Feed”.
 You’ll then be able to name your product feed, adjust your currency, and choose an upload type for your feed. The two options are “Schedule Recurring Uploads” and “Single Upload”.
With recurring uploads, you’ll be able to add a product feed and have it update whenever changes are made or new products are added. With single upload, you’ll simply be able to add a static product feed and you’ll need to manually update your feed in the future.
For this walkthrough, let’s select “Schedule Recurring Uploads”. Click “Next” when you’re ready to move on.
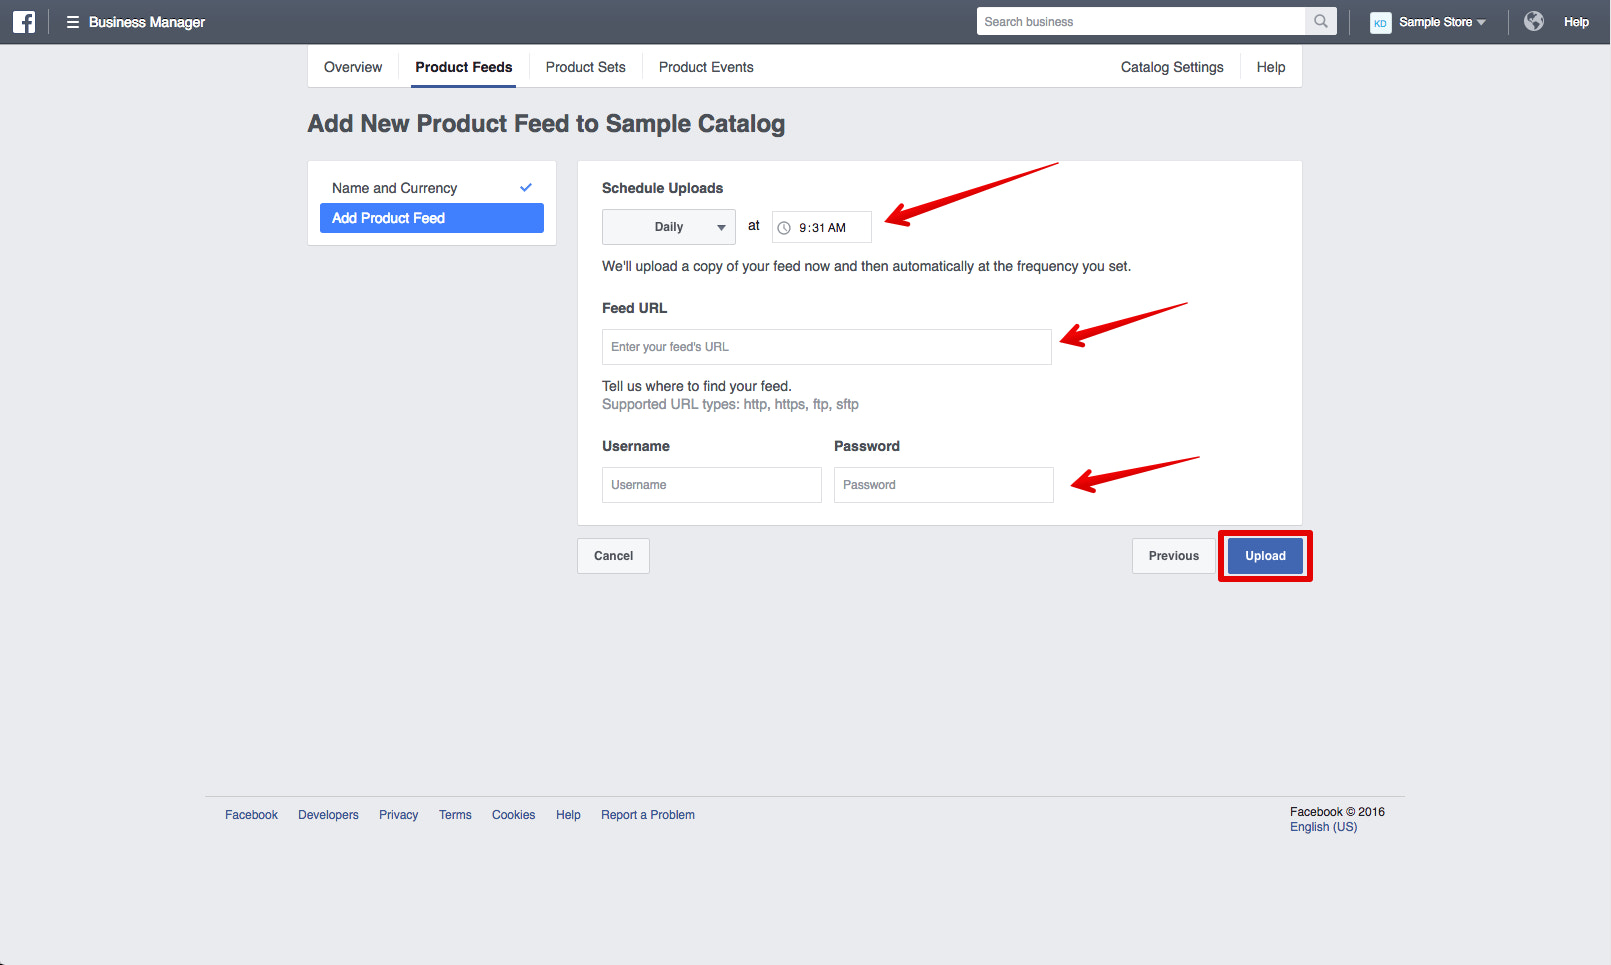 Schedule how frequently you would like your feed to update—either daily or weekly—and drop in your feed’s URL (the Dropbox, Google Drive, or FTP link for your spreadsheet), so that Facebook knows where to find your product information.
For Facebook Product Feed app users, you’ll simply need to login to the app and look for your automatically generated product feed URL (it will look something like this: “http://your-store-name-here.myshopify.com/a/feed/facebook.rss”) and copy and paste that URL.
Add the login information for your storage account to give Facebook access to the file (if necessary). Click “Upload”.
Your product catalog will now be ready to go.
2. Set up your Facebook Pixel
To help Facebook understand which of your products to serve to which audiences, you’ll need to place the Facebook pixel on your website and adjust it so that it tracks when products from your Product Catalog are viewed, added to cart, or purchased by your customers.
If you’re not familiar with pixels, here’s an easy way to think about them:
They’re a small piece of code that you add to your website to track your visitors. The information that they gather about your visitors can help you advertise to them later (a process known as retargeting) and track their behaviour when they come back to your site.
Pixels may seem confusing at first, but they’re an essential tool for tracking the success of your marketing campaigns.
 To find your pixel, head to your Business Manager. Click “Business Manager” in the top left of the navigation bar and select “Pixels” under the “Assets” header.
 If you haven’t created a pixel before, click “Create a Pixel”.
 Name your pixel and click “Create Pixel”.
 If you have a Shopify store, you’ll simply need to copy your 15-digit pixel ID and head to your Shopify Admin. Click “Settings” then “Online Store” and paste your pixel ID into the “Facebook Pixel” section.
Click “Save”. Your pixel will now be automatically set up to work with Dynamic Product Ads.

If you don’t have a Shopify store, you’ll need to manually set up standard events for your Facebook Pixel so that Facebook can track these three actions: View Content, Add to Cart, and Purchase.
Once you’ve set up your standard events, you’ll need to edit the HTML/CSS of your website. Copy and paste your code in between the <head> and </head> tags on every page of your site to finish setting up your pixel. If you run into trouble with your pixel, use the Facebook Pixel Helper to track down the source of the problem.
3. Create your first Dynamic Product Ad
To create your first Dynamic Product Ad, head over to your Facebook Power Editor.
 Click “Create Campaign” and select “Promote a Product Catalog” as your objective.
Unfortunately, Dynamic Product Ads aren’t available for the new version of Power Editor yet, so you’ll need to switch your view back to the previous version to create your ad. Click “Continue” and you’ll be switched back to the classic view automatically.
 Once you’ve switched back to the classic view, name your ad campaign, ad set, and ad. Try to use a descriptive title for your campaign so that you can easily identify it later (for instance, you could call it “Dynamic Ads - View Content - Mugs” if you’re hoping to target all of the customers who have viewed mugs on your website).
Make sure that “Product Catalog Sales” is still selected as your campaign objective and click “Create”.
After you click “Create”, edit your ad set to make sure that it’s promoting the correct product catalog. Verify that it’s set up properly and then select your budget, audience, location, placement, and other desired targeting options.

In your ad set, you’ll be able to specifically filter which products you want your ads to feature, also called a “Product Set” by selecting the “+” button under “Promoted Products”.
 You can filter your product set by Availability, Brand, Category, Product Type, and Price, allowing you to create highly targeted ads with more relevant ad copy. These filters will automatically organize your products based on the way that you’ve set up your product catalog.
Once you’ve named your product set and finished customizing its products, click “Create”. You can now use this product set to populate the products that will appear in this ad set.
 After creating a product set, head down to the “Audience” section.
Here, you’ll be able to select whether you’re hoping to target customers who have viewed content on your website, added products to their cart, or successfully purchased products. These custom audiences have thankfully already been created for you by the Facebook Pixel which is a huge relief since they’d be incredibly time-consuming (and headache-inducing) to set up manually.
When choosing an “Upsell” or “Cross-Sell” audience, you’ll also be able to specify which product sets you want to promote to customers that have already viewed other product sets. This is a nifty feature for turning your one-time shoppers into repeat customers by showcasing products that they could also be interested in or that work well with the things that they’ve already purchased.
Now that your ad set has been properly optimized for Dynamic Product Ads, it’s time to create your ad. Go to the “Ads” tab and either create a new ad or choose one that you’ve already created within that ad set.
Unlike other Facebook ads, Dynamic Ads require the use of special keywords (these keywords are actually just the section headers that you used for your product feed spreadsheet).
![dynamic ads keywords template dynamic ads keywords template]() Image credit: Facebook
Image credit: Facebook
With the help of these keywords, Facebook will be able to automatically populate your ads with the relevant product information when the ads are served.
Here’s an example of an ad template provided by Facebook. Keywords like “product.name” and “product.description” along with the actual product photo will be replaced by relevant information pulled from your product feed when the ad is served to a customer. These keywords simply help Facebook understand how the ads should actually look.
While the product photos, titles, and descriptions will be uniquely customized to each viewer, the ad copy at the top (“Jasper’s is more than just groceries…”) will appear the same for everyone.
Keep that in mind when designing your ad to make sure that your copy stays relevant and can apply to any products that could potentially show up. You can experiment with using keywords in the ad copy at the top as well, but it’s safer to stick with dynamic product names, descriptions, and pricing when you first start out.
 When editing your ad, click on the “+” button beside each field to drop in the keywords that you’d like to use.
Once you’ve customized your ad copy (and made sure that you’re tracking conversions with your Facebook Pixel), you’ll be ready to run your ad!
Let’s get personal
Now that you know how to set up your first Dynamic Product Ad, it’s time to start giving your customers an even more personalized and relevant experience on Facebook!
Have any more questions about Facebook ads? Let us know in the comments below.
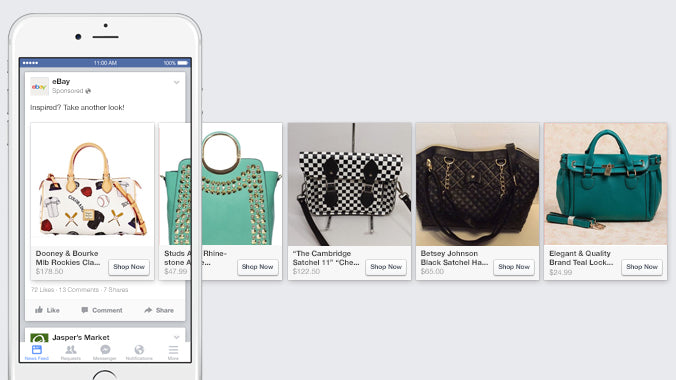 Image credit:
 Image credit:
 Image credit: