Checking your Instagram or Facebook feed, you’re almost certain to see a constant barrage of food pictures scrolling by like images in a slot machine. Everyone from world leaders to celebrities to your Aunt Mabel seems to be posting snapshots of the latest, most scrumptious treats they’re about to consume.
While these decadent pics of juicy burgers and colorful cakes might seem frivolous to some—great food photography is essential for others.
Businesses like restaurants, food trucks, bakeries, grocery stores and more thrive on the strength of their food photography. A photo that perfectly captures the essence of a dish can make or break a food business’s social media marketing strategy, blog post, or product photo—and that can mean the difference between massive sales and massive loss.
That’s why it’s so important to make sure that the quality of your food photography meets the standards that customers expect. But taking great food pictures doesn’t have to involve hiring a professional photographer or purchasing expensive equipment. Professional-looking photographs can be shot on something as simple as a smartphone camera.

Shopify Academy Course: Product Photography
Photographer Jeff Delacruz shares how you can create your own photo studio and take beautiful product photos for less than $50.
Enroll for freeTaking good food photography is less about the equipment you have and more about understanding how to emphasize the aesthetic beauty of your food through:
- Plating: How you arrange your food.
- Lighting How you use light to bring out your food's good side.
- Composition: How you frame your shot.
- Editing: Touch-ups to your photos that you can make in post.
Can’t take your own pictures of food? No problem! Download free stock photos on Burst!
Preparing your food to be photographed
Chefs use the term plating to describe the aesthetic arrangement of food. Plating may seem vain at first—one would think that the taste of food isn’t affected by how it’s presented on the plate. However, one would be wrong.
A study released by the Department of Psychology at Montclair State University found that when food was presented to test subjects in an arranged presentation, the subjects were more likely to rate both the taste of the food as well as the amount of care taken in cooking it—as higher. It’s perhaps for this reason that chefs spend a lot of time thinking about the best way to plate food.
Presentation is arguably more important when it comes to photographing food. With nothing but an image for the user to go by, the plating is the first step to creating the idea that the food being photographed is just as juicy and mouthwatering as it appears to be.
You’ll want to start by making sure to arrange your food in a stylistic manner if you intend on photographing it. Here are some things to keep in mind when plating your food before taking a photograph:
1. Know your aesthetic: If you’re photographing food that’s more natural-looking, (say a salad or a soup) you can be a bit more chaotic and messy with the plating. This isn’t to say that the food shouldn’t be arranged—but you’ll want to think of naturally occurring spectacles in nature like a garden with blooming colourful flowers or a luscious forest with jagged trees.
If you’re photographing food that’s a little more otherworldly—say rainbow smoothies or galaxy cakes—neatness in your plating is key. These sorts of foods rely more on the balance of colours and precision of lines, the same way it would be with a painting, drawing, or sculpture.
2. Choose the right surface: Wooden cutting boards and picnic tables can give a more rustic feel and look great for presenting more homey foods like burgers and fries. Classic white plates can give colourful foods a more vibrant pop. You’ll want to choose plates that best align with the food’s aesthetic and are able to bring out the strengths of the food’s visual appeal.
3. Start in the middle: When plating food, it’s best to start in the middle and work your way out from there in order to ensure symmetry in the plating of your food.
4. Think like an artist: Professional chefs use tools like spoons, squeeze bottles, tweezers and even paint brushes to meticulously decorate their plates in a decorative and precise way, like a painter designing a canvas. Don’t be afraid to use sauces and patterns to give your plate an artistic edge.
Many food photographers also put together food styling kits—a collection of accessories and tools to help with adjusting your food to be photographed. These kits often include things like tweezers, paper towels, cotton swabs and other tools to help you meticulously assemble the objects of your photograph.
After you’ve prepared your food to be photographed, you’ll want to start thinking about the arrangement and composition of the photographs themselves.
Lighting your food pictures
Good lighting is key to emphasizing the textures and color balance of your food photograph. Choosing the right lighting for your food involves thinking about what parts of the food you’d want to emphasize. Maybe you want to showcase the juiciness of a freshly cooked cut of beef—or show-off the unique texture of a perfectly sliced piece of cheese.
Here are some things to keep in mind to get the best lighting for your photograph:
1. Light from the side: Lighting from the side of your food is a great way to bring out the shadows and bright spots of certain food textures—such as bread, meat and cheese. This is especially important when photographing food that balance a lot of textures, like sandwiches and burgers.
3. Use soft, diffused light: Harsh shadows can also be prevented by using softer lighting. If you’re taking a picture under natural light—it’s best to do this by a window on an overcast day. If you’re taking pictures in-studio—try using a reflective surface to bounce and diffuse natural light or artificial light onto your subject.
Composition of food photography
Your food is plated, your lights are hot—the next thing to think about is the way that you want to frame your food image. There’s no right or wrong way to frame a food picture—but here are a couple of guidelines on the aspects of photography that you want to keep in mind when trying to get a shot that best emphasizes the strengths of your food.
1. Angles: When it comes to the angles of your photographs—you want to think about what part of the food you’re looking to emphasize. If you’re taking a picture of a sandwich for example, you might think about cutting it in half and shooting from the side to show the texture and juiciness of the beef.
Side-shots won’t work for all food though. Things like a salads or a charcuterie board are best shot from in an overhead, flat-lay style in order to show the intricacies of the arrangement of elements.
You also want to keep your photo’s saturated. Try to keep the overall composition of the photograph warmly coloured as well. Studies have shown that certain colours can trigger sensory reactions in the brain that increase appetite. Warmer colours—like reds, oranges, and yellows—are best for stimulating appetites. Greens can give a more natural and organic feel to your photographs.
You want to avoid harsh, cool colours (blues and purples). This isn’t to say that bright blue berries or rich purple grapes can’t add a much needed pop of colour, but avoid cooler filters on your photographs. Most foods—meats and cheeses especially—look unappetizing under a blue glow.
Try experimenting with focused, close-up shots and less focused backgrounds. Playing around with the depth of field of your photographs can help to add emphasis to more textured foods—this effect works especially well with pasta dishes.
Editing your food photography
After you’ve snapped your pics, you’ll want to use a photo editing tool to make some light touch-ups. There are both paid and free photo editing software options, depending on your needs and budget. You don’t want to do too much editing, but careful alterations to the color balance and shading will give your photographs a more polished and professional look.
Here’s a food photo prior to making any touch-ups:

The food is plated beautifully and there’s some interesting balance to the composition. Everything appears well lit and the image is a great start to a perfect food photograph, but let’s touch it up a bit to really bring out the flavour of the photograph.
Here’s some editing steps we took on this photograph that you’ll want to do on your own photograph:
1. Sharpen the Image: Generally speaking, your image should be fairly sharp assuming you’ve used a steady camera and clear lighting. However some adjustments to the sharpness of the image will give the edges more definition and help to differentiate aspects of the image.

In Photoshop and other photo-editing platforms, you can sharpen an image by applying what’s called an Unsharp Mask. Unsharp Mask filters increase the contrast between adjacent pixels, giving the edges of your image a more defined look.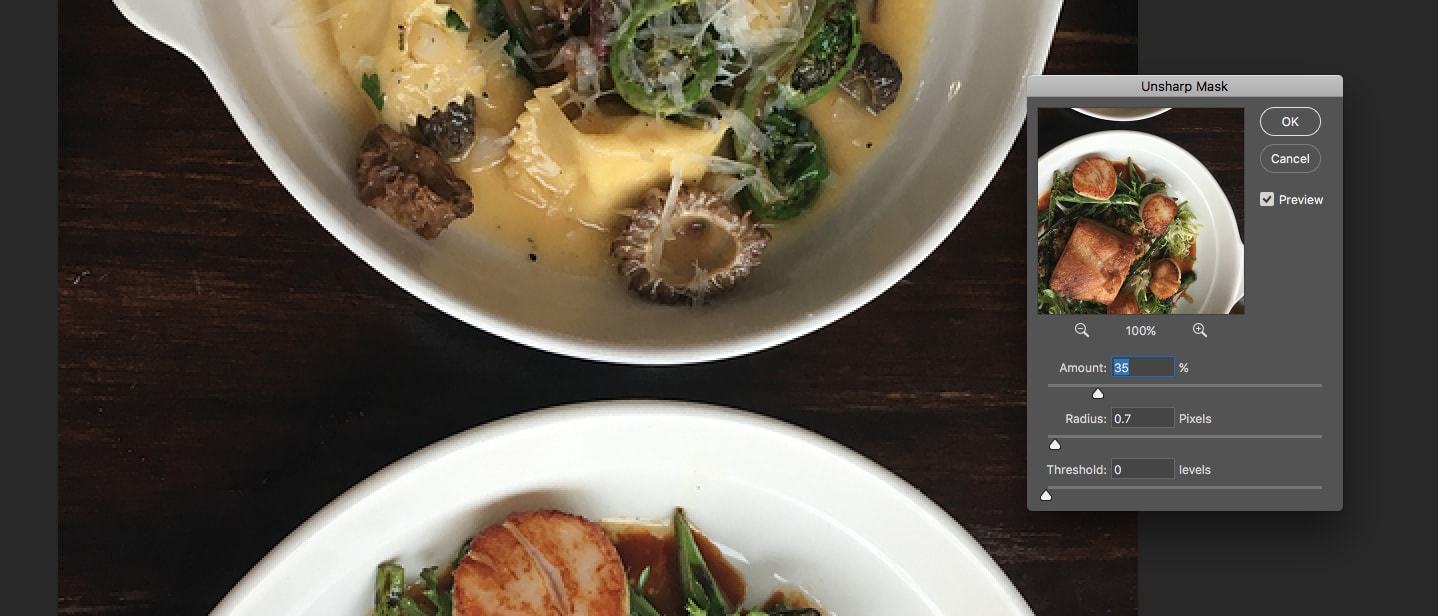
Unsharp masks give three adjustment options:
Radius: This controls how many pixels adjacent to high-contrast edges will be affected by the filter. If you’re photo contains fewer, larger objects you can adjust this to a higher radius of about 2. For images with more intricate elements and sharper lines, you’ll want to use a lower radius between 0.05 and 1. For our image above, we’ve used a radius of 0.7 because there are a lot of sharp lines on the dishes.
Amount: This option controls the amount of contrast that will be applied to the edges of image. Usually with food pictures, it’s best to keep this minimal. A high amount of sharpening can give a more “gritty” feel to your photographs, and while this may work for some types of photography, gritty food can appear unappetizing.
Threshold: This adjusts how much of the image is affected by the filter. A value of 0 will apply the filter to the entire image. As you adjust the threshold, high-contrast areas of the photograph will be sharpened while low-contrast areas will not be.
In the above example, we’ve kept the threshold at 0 because the abundance of lines in it benefits from a lower threshold, but feel free to adjust this a little higher if your food photograph contains larger objects and less lines.
2. Fix White Balance: White balance refers to the tint of the white parts of your photograph. Adjusting white balance can help to make an image look more “warm” or “cool” depending on how you adjust it.
When taking pictures of food, using a warmer white will make the food look more appetizing than cooler light:

White balance can be adjusted in different ways depending on the photo editor you’re using. For Photoshop, you can adjust this by selecting the image and then selecting Adjustments > Color Balance.

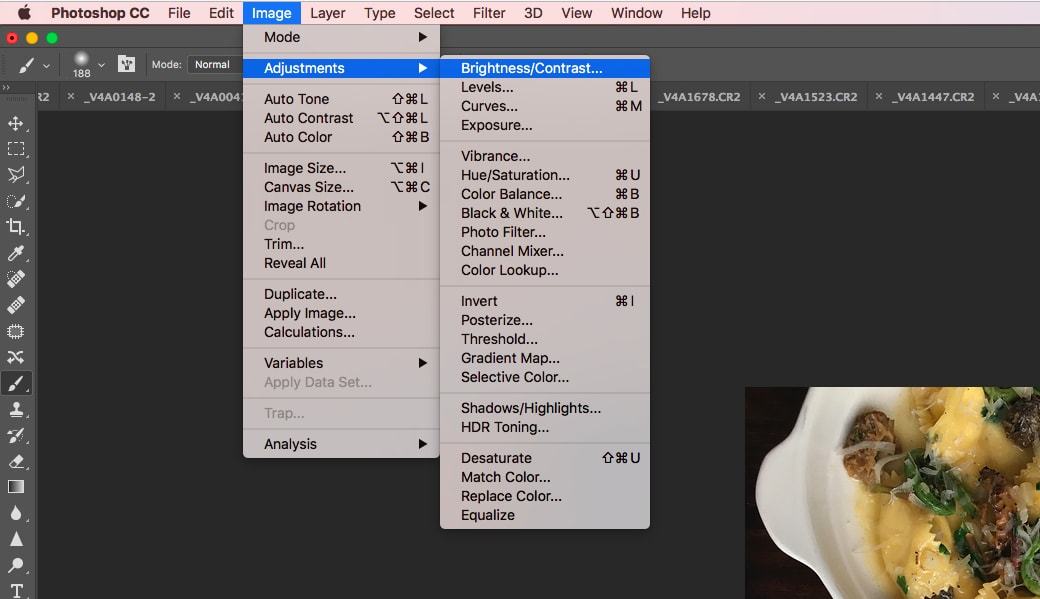
Different photo editing software will have different ways of adjusting the brightness and contrast of your photographs. In Photoshop, you can do this by selecting Layer > New Adjustment Layer > Brightness/Contrast. This will give you a panel with sliders that allow you to adjust the brightness and contrast of your photograph.
Giving a slight boost to your brightness and contrast will bring out the diversity of colors, highlights and shadows in your photo and make for a more eye-catching image.
When it comes to food photography, more saturated, warm colors tend to be more appetizing. Think of the intense color of juicy, red beef or a bright orange slice of mango. Adding just a bit of saturation in a food picture is a great way to bring out the colours of your photograph and make the image seem all the more mouth-watering.

These are just some basic photo-editing techniques, but even with all of these techniques applied we can see a big difference in the way the image looks:
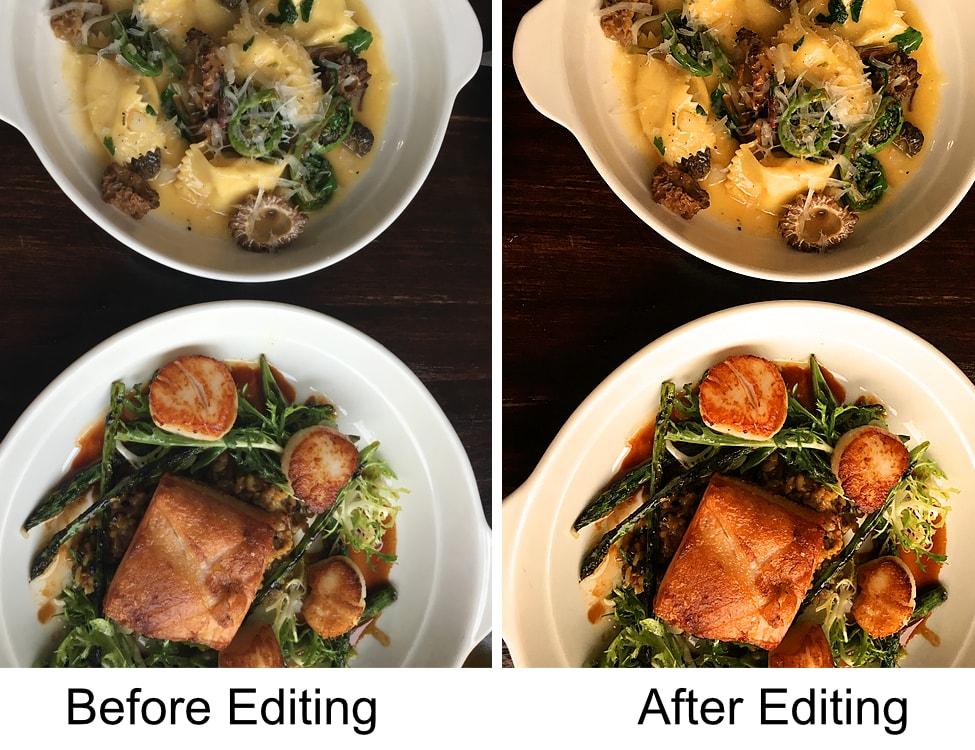
There are a lot more advanced editing techniques that you can apply if you’re an experienced photo-editor, but even some small, basic changes can make a big difference.
Final tip: be creative
Food photography is an art, not an exact science. While these are some rough guidelines that will help you get better pictures of your food, don’t let them stop you from experimenting with filters, lighting techniques and composition that can bring a creative edge to your photography. Use The Complete Guide to DIY Product Photography to continue learning everything you need to know about capturing your food.
There are a ton of incredible and interesting ways to play with your food. Don’t afraid to try new things—like using food to sculpt a landscape or making desserts that look like cute animals.
A unique take on the concept of the food photograph is a great way to give your pictures an edge. The more unique a perspective you can bring to your food photography the more likely you are to catch the attention of those social media users scrolling through their feed. And at the end of the day, catching people’s attention—and hopefully their tastebuds—is what’s most important.
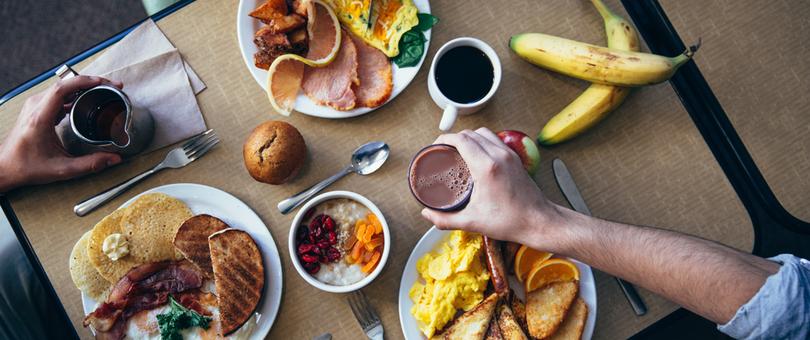
Banner image via Burst.